
Horned Hennin hat version 2 in dark red cotton velvet with faux pearl and metal embellishment
A while ago I made my first horned (or heart-shaped) hennin. Recently, a friend commented about wanting to make one of her own, but as we were discussing styles, I realized that she wanted a different style than what I had in mind.
I was tickled with the idea of trying a different method (and being able to help her do the same) so decided to look a little more at this style, to try to make a new horned hennin of my own.
My friend wanted to make a “Christine de Pizan double horned hat”, which led me to images like this:

Christine de Pizan book illumination
and this:

Christine de Pizan was an Italian-French writer who lived 1364 – c. 1430
Wikipedia reports that The Book of the City of Ladies or Le Livre de la Cité des Dames was finished by 1405, along with The Treasure of the City of Ladies (Le tresor de la cité des dames de degré en degré, also known as The Book of the Three Virtues, where this style of headdress is regularly depicted. With that in mind, I’m considering the depiction of this style to be about c.1400-1405.
Specifically dating a style may actually be quite important:
“As Europe continued to grow more prosperous, the urban middle classes, skilled workers, began to wear more complex clothes that followed, at a distance, the fashions set by the elites. It is in this time period that we begin to see fashion take on a temporal aspect. People could now be dated by their clothes, and being in “out of date” clothing became a new social concern. National variations in clothing seem on the whole to have increased over the 15th century.” – Wikipedia
This may be important when I decide what to wear with this hat, along with anything else I decide to work on in this area.
This style is far more “horned” than my other creation, which in comparison is much more “heart-shaped”. Kat’s Hats relates that this horned hennin style was popular c.1410 -1440, and started out quite large, however by 1430 the horns (templettes) became smaller, angled further back on the head, and the veil worn over them was softer and less starched.
She relates that at the time this was know as the Attor de Gibet, and was Burgundian-French in origin, but also had fashionable interpretations in Italy. The early versions had starched white veils attached to the templettes with pins, and sometimes the templettes would be embellished with jewels, silver, or gold. Some illuminations and paintings show the veil folded in complicated manners, while others show a heavy trim of ruffles on the face edge.
Breakdown:
What I see in both of these illuminations, is that:
- the “horns” and veil are both white, though in the second illumination the veil appears to be more sheer.
- the back of the veil is quite short – hanging only to the back of the neck.
- no wimple is worn with the headdress.
- the veil has a clear V-shape at the forehead.
- the horns completely cover the ears
- the headdress is worn high on the head – no hair is visible at the hairline. This is also likely during the time when a high forehead (ahem.. like mine!) is fashionable. (I knew I needed to explore more Burgundian fashion…)
- the length/height of each horn appears to be the same height as the wearer’s head.
- the overall width of the headdress exceeds the width of the wearer’s shoulders.
- my own speculation suggests that the ‘base’ of each horn is as wide in circumference as the wearer’s head.
- my own interpretation suggests that these aren’t just cones – that there is an upward curve to the cone – more like a harvest cornucopia or a drinking horn than an ice cream cone.
Additional images
I also referenced the following images as well, which had some differences from my original inspiration images.

Direct link from Pinterest / Women Cimbri BnF French 599 fol. 69
Unfortunately I wasn’t able to find out much about this image – so I don’t know the date or artist associated with this image.
- Here the veil is much longer, reaching to at least the wearer’s shoulders and below.
- The “horns” (templettes) appear to be either decorated with, or made of a fabric where there is a striped and dotted design.
- The veil is white and not sheer, while the horns appear to be gold and red.
- The horns are shorter, and narrower, with more of a cone shape.
- There is still no wimple, though one of the other women in the painting is wearing a wimple.
- Without a lot of other aspects of this painting being visible it’s hard to see what else is happening, but one dress seems to have short sleeves (that I’ve seen on mid 1400s Italian paintings.
- With how crowded the scene is, it’s difficult to estimate if the headdress is as wide as her shoulders, narrower, or wider.
- It looks like the horns still completely cover the ears, and again, no hairline is visible.
- The veil has a softer V-shape at the forehead than the other illustrations.
Portrait of a young woman in a pinned hat (1435)
This painting by Flemmish painter Rogier van der Weyden shows:
- A semi-sheer veil that falls just below shoulder length, with complicated folds.
- The horns cover the ears. The hairline isn’t visible under the veil
- The horns and veil are both white.
- The horns are smaller and narrower than my original inspiration images, and the overall width of the headdress is narrower as well.
- The wearer has a wimple
- Source above is Wikiart, Wikipedia calls this painting ‘Portrait of a Woman with a Winged Bonnet’ and dates it at 1440.
Rogier van der Weyden also shows this style of headdress on Isabella of Portugal, however with the very fine, decorative veil, it’s difficult to see the shape and form of the headdress.

Direct link from Pinterest – detail of Seven Sacraments Altarpiece by Rogier van der Weyden
Another painting by the same artist is a triptych entitled Seven Sacraments Altarpiece, c. 1445-50. In the leftmost panel, there are two women (perhaps attending a christening?) with horned headdresses- each unique from the other.
The one on the left has golden cauls over what could be a skullcap or short hennin. Then the veil appears to be partially supported perhaps by a wire like a butterfly hennin. It’s hard to say… Her cauls cover her ears. The front of her veil is sheer while the back is quite solid….
The one on the right has a solid white textured … thing… with highly contrasting brown/red horns with golden trim at the base. The horns/headdress do not cover her ears. Her veil does not appear sheer.
Neither women have a wimple, and the hairline of neither is exposed. Both have veils that are at least shoulder-length if not longer.
Jean van Eyck

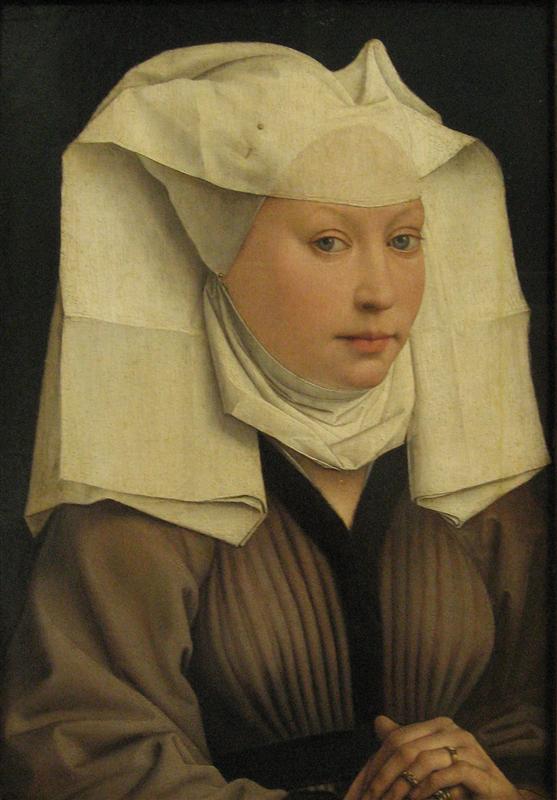
Portrait of Margareta van Eyck by Jean van Eyck, 1439
Finally, I looked at this Portrait of Margareta van Eyck by Flemmish painter Jean van Eyck, 1439.
Here there are many similar characteristics, and many differences.
- The hairline does not show, and the wearer does not wear a wimple.
- The veil is very solid, trimmed at all the edges with frill, which is very heavy at the top balanced between the horns.
- The veil is white, while the horns appear to be made of a brown-on-brown damask in a checked pattern.
- There is noticeable gold gimp-braid on the edges of the horns.
- The veil does not have a V-shape at the front. The veil is just below shoulder length at the front, and longer in the back.
- The horns are cone-shaped and very small, sitting before and above the ears, not covering the ears at all. They are very narrow in circumference, and not very tall at all – the overall width of the headdress is about shoulder-width or less.
Take-aways
In looking at the inspiration paintings, I decided that I wanted to do the larger, more exaggerated (likely earlier) horned headdress, but I wanted to include more colour, and have my horns of one colour while staying with the white veil.
I don’t want to wear a wimple with my costume, and would likely stick with a simple draped veil rather than something starched and folded into a complex shape or heavily frilled. I may try to accomplish the V-shape with the centre front… but may opt to just drape and pin it over the horns in a more simple fashion. I’ll see how it looks.
I decided that the hairline shouldn’t show if I could avoid that (though that might just be covered by the veil) and that the veil could be pretty much any length and shape. I may just re-use my existing fine white linen 1/2 circle veil.
For a while now I’ve been joking on my Instagram feed that I really should do one of the early 15th century styles where the super high forehead was fashionable… sometimes I look at my selfies and feel that my face is 60% forehead! Not showing my hairline will NOT be a problem!
I wanted the horns to be very wide and tall, and to curve up in the ‘cornucopia’ style, rather than the ice-cream-cone style. I may opt to decorate the horns, with ribbon, gemstones, pearls, beads, filigree, etc.
Accomplishing the shape
The challenge I have with a lot of historical millinery, is that even when extant garments exist, there is not a lot of information provided to the general public about what is INSIDE the hat. The external fabric content is sometimes mentioned…the lining may even be mentioned.. but the structure is rarely discussed.
Some options may include:
- wicker/basketry/reed – certainly this would have been an available material, it’s relatively lightweight, and easily shapeable into the cornucopia shape. Unfortunately I don’t have this skill, and think that it would be lumpy and cumbersome to create this shape. I’ve seen speculation that the huge Italian Balzo hats were based off a wicker frame to get the huge shape without huge weight.
Kaarina hat – lined with birch bark
- Other plant materials – I’ve read that there’s evidence for birch bark used to support early-period millinery, however this is tricky to work with, and I think the buckram method (discussed below) is a far better option for what this accomplishes. Straw (like modern straw hats would be another plant material that could have been used in period to achieve basketry-like shapes.
- felt / densely woven wool – this too
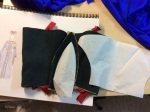
The interlining of the hat, along with the paper pattern
would be a possible material for millinery at the time. I used this style of technique for my Ottoman hat and my Byzantine hat, but feel like a sharper line could be accomplished with other materials.
- wireframe – while I like wired hats, I find wireframe difficult to maintain, and difficult to make symmetrical shape. This has some basis for historical accuracy – wires from historical millinery have been found… but I feel they are more like my next option…
- wired buckram – the historical consideration would likely be stiffened linen canvas – which was used certainly in later periods for support and structure, and possibly in earlier periods as well. Supporting the buckram with wire would make for a lightweight, shapeable, symmetrical hat with a crisp shape.


Drafting the pattern
I started out by sketching the hat with the proportions I wanted. This was an incredibly rough sketch just to get me thinking of what the pattern for this could look like. I didn’t want to go with “cones” – I wanted that curved cone, like a cornucopia or a drinking horn. This meant it wouldn’t be enough to draft a ‘cone’, but rather I’d need to draft a three-dimensional shape with complex curves.
On this sketch I also took notes on size and dimensions.
At this point I also looked at the horned hennin made by Jennifer Smith. She started with reed hats and undid the straw braid to re-make her cones. I didn’t want this method, but it definitely helped me think more about shape in three-dimensions.

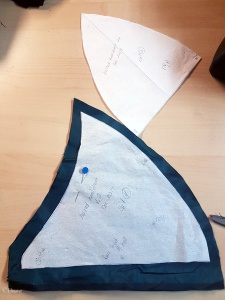
Taping together card stock pattern pieces to get the three-dimensional approximation of the hat I want to create
Once I had my sketch, I drew some shapes on card stock, cut it out, taped it together with painters tape… and tried it on.

Trying on the first draft of the pattern for a horned hennin, and marking the pattern with changes I want to make.
I didn’t take a photo of myself in the cardstock pattern – but instead took a photo on a foam head. (Note: the foam head is far smaller than my own head + hair.. so the pattern looks too large on it.)
From the first version I decided to make it a little less wide, (marked above) and then also decided to take some from the inside curve as well.

Second draft of the horned hennin, mocked up in cardstock.
I liked the outer shape of the hennin, but thought the inner curve was a bit too dramatic and sharp. I put the piece back in.

Adding the inner curve of the pattern back in.
Some fussing and re-drawing, cutting, and more taping, and I finally had a half-hat that I thought looked about right. I transfered this (and polished it a little) to pattern paper, and then went to my buckram.

The traced off pattern for my version 2 horned hennin.
Construction
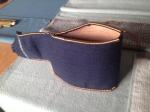
The buckram form
I started with my shapes in buckram, and on my machine butt-stitched as much as I could. This means there was no seam allowance – the edges of the buckram butted up against one another. This would keep the line as smooth as possible and have no significant ridges.

Butting the edges of the buckram up against one another and using a wide zig-zag to sew the pieces together flat.
Because of the complex curves of the horned hennin, I had four small areas at the edges of the horns to sew by hand. Here too I used a stitch that would allow the pieces to butt up against one another, instead of overlapping.

A hand-stitched butted seam on buckram for my horned hennin.
Once I had two horns, I realized in order to get them to fit closer to the back of my head, they would need to slightly overlap in the back, so I adjusted my pattern accordingly, for when I’ll cut the gusset out of fabric.
I made the horns as two seperate pieces for easier construction, and to better adjust the fit. For the fabric parts of this hat, I’ll cut the gusset as one piece going between the two horns.

Taking an inch at the back of the gusset out. I didn’t also take that inch off the horn back – since this will overlap instead.
At this point I tried on the two halves (taped together at the centre!) with my half-circle veil to see how it might possibly look… it’s not a subtle hat at all! It was at this point that although I like the elegance of the all-white headdress… I decided to go with dark horns instead – which was also supported by the illustrations from my inspiration.

Trying on the work-in-progress horned hennin (no makeup selfie!)
Wiring the form
To make the hat easier to handle while wiring, I first wired the side edges of both horns. I then wired the face edge/back of head edge.

Stitching the two horn-halves together at the top of the horned hennin.
Then I stitched the two halves together, overlapping the back by about an inch. The stitching here isn’t very consistent – but the goal is just to get the two pieces in line… the stitching won’t ever be seen. The messiness is largely due to not being able to really pin the pieces together – they were taped, and a third hand really would have helped!
I also stitched down the overlap at the centre back, just to smooth the overlap and secure the wires.

The buckram form for my horned hennin (version 2) fully wired and ready to cover!
Finally, I wired the top gusset shape – making all of the edges on the hat fully wired. Wiring will help shape the hat, support it with the fabrics that will go over the buckram, and strengthen it. This will NOT be a very easy to transport hat at all… so the extra support is important!
I tried the hat on at this point too – but opted to take a photo/video on my foam head instead of on me.
Padding the hat
Next I cut the shapes out of thin quilt batting. In this case some that was gifted to me – it’s 50/50 cotton polyester – if I wanted this to be more period-correct I’d use 100% wool – but I feel like this is a good, cost effective alternative. In the Tudor era the material used for this technique was called dommet – though I don’t know of period techniques for this particular era.
This padding is done to cover up the wire, any lumps from stitching (as well as that coloured thread I used) and overall smooth out the hat. This also means I could use a thinner material to cover the hat – though in this case I won’t be.

Cutting my horned hennin pattern pieces out of a thin quilt batting.
I sewed this up with the same butt-stitching as I did with the buckram, to reduce bulk at seams wherever possible.

Using a zig zag stitch to sew the batting with a butted seam.
I put the batting ‘sleeve’ over the buckram form, and stitched it down quickly with a whip stitch in place. This will just keep it from shifting or bunching when the final fabric is applied.
Again, I took the photo on my foam head. (Keep in mind that the foam head is significantly smaller than my own, plus no hair!)

Horned hennin with the thin batting before being stitched down.
The outer fabric
Finally I cut the pattern from some red cotton velvet. It was a skirt my former teacher gave me – I love recycling! This too was sewn together, although I used seam allowance here, and did my best to get the sharpest peaks on those horns I could accomplish. I also zig-zag stitched the raw edge at the face to keep it from fraying while I worked on the project.


Once the velvet was sewn up, I marked it with painters tape – where I wanted the embellishments to go. I did it with tape because I would be taking this on the bus.. and I knew the chalk would brush off too easily in transit.
I also put the hat together again just to see how everything would work – and took these photos below. (more photos without makeup.. lol)
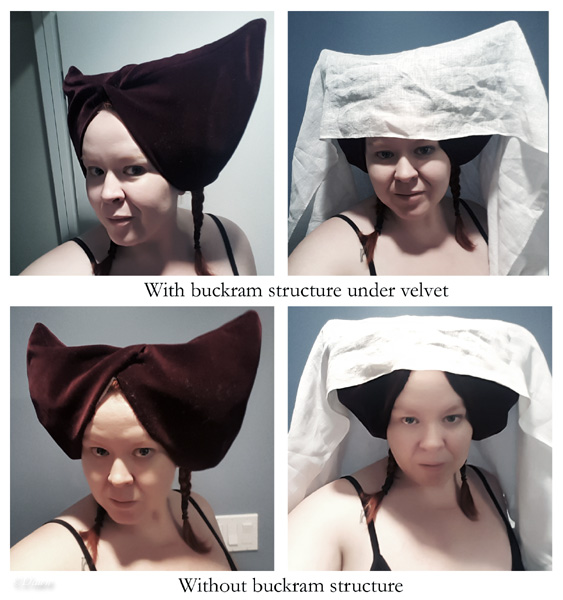
Comparing the horned hennin with and without the internal buckram structure.
With these there is the padding under the velvet as well – and it’s interesting that the buckram makes the overall effect crisper and smoother, but the fabric-only horns still support the veil (albeit not in quite the same shape).
I think that this means that it might be possible to do an inner structure of felt or fulled densely woven wool, to get a similar look, with something that would be faster to construct and MUCH safer to transport. However, I really do like the crisper look…
I can see some desire in the future to make a fabric-only set of horns supported with felt/dense wool, to have a more packable option. I’ll see how much I like THIS set before moving on that though.
Embellishments
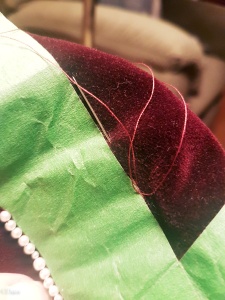
Sewing along the painters tape to mark the line.
I marked the velvet hat with painters tape because I was taking the hat while out for holiday at my boyfriend’s parent’s house. I opted for a design using small metal filigree bezants (silver-plated brass links from Fire Mountain Gems) and small faux pearls. I opted for the silver tone colour way rather than the gold because I thought it looked more interesting with the red velvet. I also have a LOT of things in a red/gold colourway already… and far prefer silvertone. I also had a lot more of the silvertone bezants… and I didn’t want to worry about running out half way through the project!
All of the beading was done by hand… I found that my pearls were three different sizes, but opted to use them randomly anyways, although it does mean the spacing isn’t 100% even. I thought about doing a grid pattern, but ended up doing something linear and angled which I really like the finished result of.
Finishing
Next I slipped the embellished velvet ‘hat’ over the buckram form (which was already covered with the padding), and manipulated it into place. “Slipped” is a bit simple – it was a VERY tight fit (as it should be) so it did take a fair amount of manipulating.


Cutting the lining for the horned hennin
I hand-stitched securing the edges of the velvet over the edge of the buckram form. I used a single thread to do this – and did a tiny stitch on the right side, and a longer stitch on the back side. With a single thread (in a matched colour), and the pile of the velvet, the tiny stitch is invisible on the right side of the hat.
From there I cut lining out of a silk-like green fabric that I used for my sideless surcote a while ago, sewed it together, pressed the face-edge, and pinned and then slip-stitched it into place. The stitches are visible, so that if the lining becomes soiled (with face/hair oils, makeup, etc) it can be relatively easily replaced.

hand-stitching the lining of the horned hennin into the hat
Veil
For the veil, I re-used my half-circle fine linen veil that I originally made for my first Byzantine costume. When I was playing around with it, I realized that if I did a double fold from the centre back to the ‘horns’, I could get a soft V-shape in the centre front. Opting to pin the veil into place makes it a lot more versatile than sewing a veil into place, and will let me play around with the shape more.

15th century horned hennin. In this photo you can see the length of this particular veil.
One note – I took all of these photos NOT with appropriate gowns… I’m actually wearing the hennin with a 11th century Byzantine gown and mantle… wayyyy out of the right period – but I just really wanted to take photos – and haven’t yet made an appropriate 15th century gown to go with this.
Other milliners & costumers

Selfie in my new horned hennin
Some of these I found while I was doing my initial research, while others I found while trying to re-find some of my inspiration images… LOL I wanted to include them for other variations on how people have tried to interpret this style of hat.
Perline la Tisserande opted to wet-felt the structure for her horned hennin and covered it with silk. I think the shape she used could easily be accomplished by creating this as a dressmakers hat – but hers is likely far more successful. I also love that it’s packable! Mine definitely will be a challenge to transport!
Raven Rose created wireframe horns for her headdress, mounted them on a linen veil strap, headband style, and then covered them in fine linen. In one photo she has wrapped her braids around the horns (not shown in any of the paintings I found), and in another photo she’s skipped that… Oddly.. I really like the hair-wrapped horns look!
Annas trådar used styrofoam cones, secured to a linen headband, and then did a lot of wrapping of veils to get coverage while still keeping the overall shape. While the materials might not be accurate, the final result is great! She opted to wear a wimple with her costume.

15th century horned hennin
Historical Sew Monthly
The Challenge: January: Mend, Reshape, Refashion: Mend or re-shape one of your previously made historical clothing items, or refashion a new one out of something not originally intended as sewing fabric.
See other creations on Instagram #HSM2018JanProgress (for works in progress) and #HSM2018Jan (for finished items)
This early 1400’s style of horned hennin is my second attempt at replicating this style. It meets the challenge because I reused the outer fabric – refashioning it from an unworn skirt into this hat.
Material: The fashion fabric for this hat was originally a velveteen skirt I recieved to re-fashion from a former teacher. The buckram was purchased new, the padding was gifted, and the lining is leftover from another garment.
Pattern: self-drafted
Year: c.1400-1460
Notions: buckram, thread, millinery wire, faux pearls, bezzants, dommet/padding.
How historically accurate is it?: Speculative based on paintings and illuminations only. No extant hats that I could find online with quick searches.
Hours to complete: Unknown. Guessing 20+
First worn: Just for photos so far. I intend to wear this to Grand TUA (SCA class event) in the spring to celebrate the elevation of a friend of mine to the order of the Laurel.
Total cost: No out of pocket costs – everything came from my stash, and some of it was free-to-me. If purchased retail for this project I’d estimate $40.
Velveteen – approx $14/m, 1/2m used
Buckram – approx $10/m, 1/2m used
Wire – approx $8
Lining – approx $10/m, 1/2m used
Padding – approx $5
Pearls – approx$5
Bezants – approx $5

Another great post thanks and Happy New Year.
Fascinating, in the Jean (or Jan? Van Eyck portrait showing the exaggerated hairline and eyebrow plucking of the day, it almost looks as though the plaited basket weave each side could have been her own hair. Rather like modern day punks shave everything except a small portion on top that the wax or plait.
In fact, you must know from wearing one that with plucked heads I e wonders how they kept some of these constructions in place. I have seen others with coils that could easily have been the wearers hair.
I love your research and detail.
Joséphine
Thank you so much!
It’s possible it could have been hair… though I think it’s most likely fabric because of the trim at the bottom – though I suppose that too could be a braid… though in the extreme close up https://upload.wikimedia.org/wikipedia/commons/7/70/Margareta_van_Eyck.jpg they are two different colours. (Though it does kind of look like black net over brown fabric more so than a basket-weave fabric come to think of it…. and the brush strokes of the brown are all in the same direction as if smoothed hair over some sort of form….hmmmm interesting rabbit hole! )
I’ve seen some reenactors who made ones using their own hair to hold the horns in place, but it would be limiting (for reenactors) to need long hair. I think that once it’s fit really well to your head, it isn’t that hard to keep them on – I mean… as long as you aren’t bending over a lot LOL!
[…] making the second version of the horned headdress – the horned hennin for the January 2018 Historical Sew Monthly challenge – I learned […]
[…] accompany my new horned hennin, I want to make a V-neck Burgundian gown. This has actually been on my wish-list since 2014, so […]
[…] Horned Hennin (version 2) […]
[…] researching my red horned hennin, I kept coming across the Cross Tree Headdress as well, (or examples like it) and little by little, […]
[…] researching my red horned hennin (to the side), I kept coming across the Cross Tree Headdress as well, (or examples like it) and […]