
Today’s post is one that I’ve been in a bit of a muddle as to what to call it, as it seems to span borders. In German these cookies are called Schwarz-Weiß-Gebäck (black-white-cookies) but they also pop up in the Czech tradition of vánoční cukrovi (Christmas sweets), which involves making lots and lots of cookies on the off chance you get visitors. And those Czechs have a name that just trips off the tongue…the very simple linecké dvoubarevné těsto, which as far as I can make out means Linzer two-coloured dough.
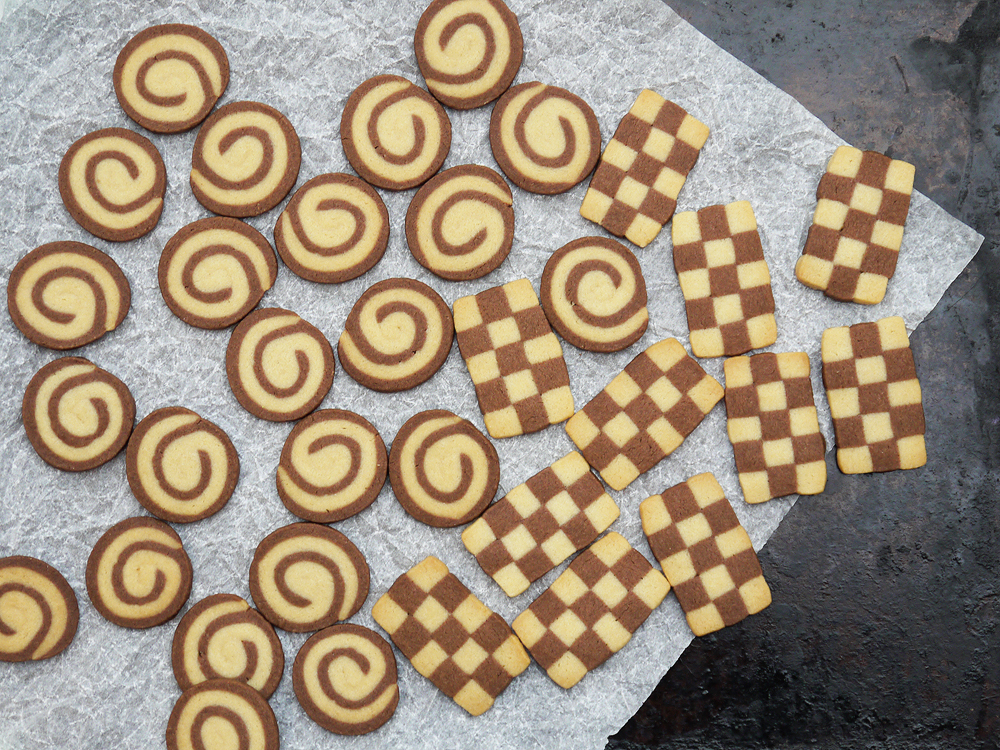
On the one hand, these cookies are easy – it is a simple rich butter dough which is quick to prepare. You just make one big batch, split in two, and colour one portion with some cocoa powder. So far, so easy. But the fun bit is when you have to combine the two doughs into all manner of different shapes and patterns. If we’re staying with the Czech terminology, you’ve got the choice of chessboards (šachovnice), pinwheels, (závitky) or salami (salam) – this last one is for those that don’t have a lot of time, or a good way to use up the scraps after you’ve made the intricate shapes!
I have something of a soft spot for these cookies, and I remember making them when I was very young. Or perhaps I just remember them being made while I watched? I’ll admit my memories of being a young child are not exactly crystal-sharp these days. But they do have a definite retro charm to them – they look striking and intricate, but this is nothing to do with layers of icing or complicated decorative techniques. And they also taste delicious – slightly sweet and buttery with vanilla and chocolate. Getting them looking good is just down to someone taking the time and having the patience to prepare everything very, very precisely.


While these might look complex, don’t be intimidated. The dough is done in about 5 minutes, and the design just needs time. Put the radio on and list to carols, a play or one of those overviews of the year that we’re about to finish, and it’s a great little job to take your mind off things. The chess pattern takes the longest, but all you are really doing is cutting strips of each dough which have the same width and height, and then building an alternating pattern. It’s not unlike playing with those number blocks we used to have in school for counting! The spiral is the easier option, as you just need to get two pieces of dough on top of each other and then roll it up like a small carpet.
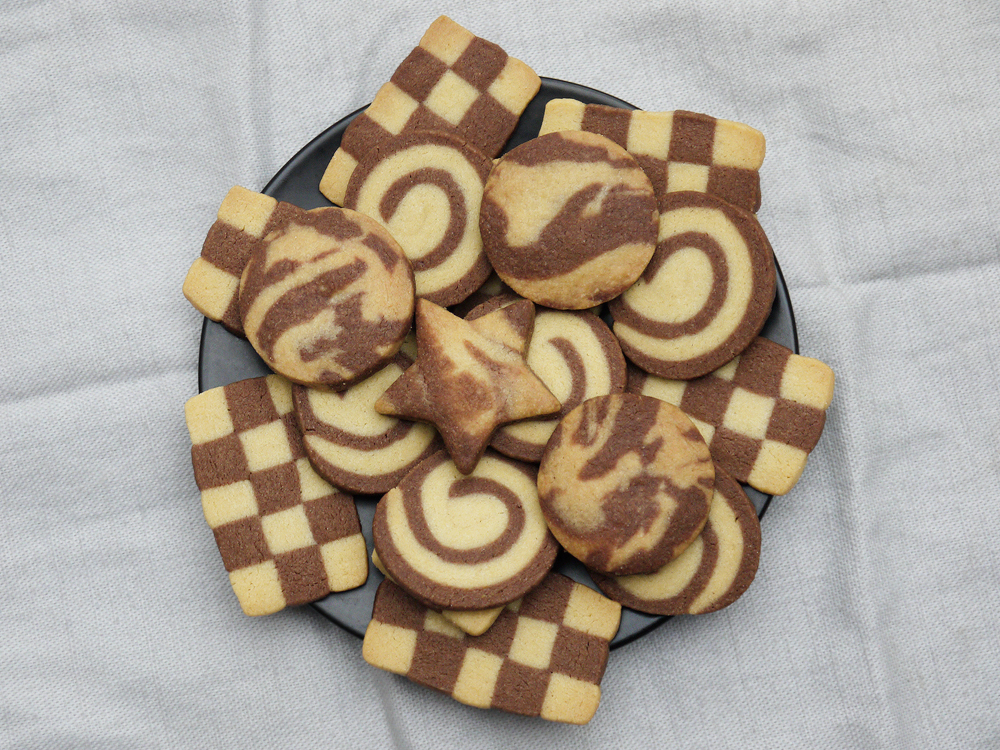
Another approach which I’ve seen but not tried is to roll the dough as for plain cookies, then use smaller cutters to cut out shapes – so you can cut out a large dark star and a large plain star, then use a small circle cutter to swap the centres of each to get the contrast. And of course, when you have all the scraps left over, you just gather then up and make a marbled salami cookie – tastes as good as the rest, and an easy one to do with small children.

I was also very pleased with how these cookies turned out. They are cut just half a centimeter thick, and as there is no baking powder in them, they don’t spread or change their shape. So they are very thin, very crisp and I think really quite elegant. I think they look a little bit like the sorts of fancy cookies you see in a chocolatier or a patisserie wrapped in film with a little golden bow. And who knew that all you need to achieve the same thing at home is just patience, patience and more patience?
To make Schwarz-Weiß cookies (makes around 40-50)
For the plain dough
• 175g butter
• 110g caster sugar
• 1 teaspoon vanilla extract
• 1/4 teaspoon salt
• 1 egg yolk (reserve the egg white to assemble the cookies)
• 250g plain flour
• cold water
For the dark dough
• 10g cocoa powder
1. Put the butter, sugar, vanilla and salt in a bowl and beat until well combined. Add the egg yolk and mix well (keep the egg white for assembling the cookies). Add the flour until the mixture forms a crumbly dough. Add just enough cold water to get it to come together to make a firm dough (be careful with the water – add just half a teaspoon at a time – you really don’t need much).
2. Once you have your dough, divide it in two (ideally weigh it to be precise). Wrap one part in cling film and put in the fridge. Put the other half in a bowl, add the cocoa powder, and mix well until you have an even colour. Wrap the dark dough in cling film and put in the fridge. Leave both doughs to chill for at least an hour.
3. Time to make some patterns! Remove the dough from the fridge, and work it briefly so that it becomes malleable.
3a. Checked cookies – the time-consuming method. Roll out each piece of dough to 1 cm thickness (keep them separate). Now use a sharp knife to slice them into 1 cm strips. Once you have done the dark and light dough, start to build up the pattern. Take the first colour, the other, and alternate to make the first layer, brushing the pieces of dough with some beaten egg white to ensure they stick properly. Now build the second layer, being sure to alternate the colour (so if you started layer one with the light dough, start layer two with the dark). Repeat for the third later. Press everything to ensure you’ve got straight sides (or as straight as possible without squeezing too hard and ruining the pattern you’ve made!). Wrap the log in cling film and chill for at least 30 minutes, or overnight.
3b. Spiral cookies – the easier method. Roll the light dough to a rectangle of 20cm x 15cm and 1/2 cm thick. Do the same with the dark dough. Brush the light rectangle with lightly beaten egg white, and place the dark on top. Press gently. Brush the top with more lightly beaten egg white. Now roll it up from the long side like a Swiss roll. The dough might look like it is cracking initially, but don’t worry – just keep rolling it up tightly, then when you are done, roll it back and forward on the worktop to get as good a perfect cylinder as you can. Wrap it in cling film and chill for at least 30 minutes, or overnight.
3c. Marble cookies – the easiest method. Break the light and dark dough into chunks, mix them up and press together to create a marbled effect. You can fold and roll it as much as you want, but the more you play with the dough, the less pronounced the different colours will be. Form it into a fat sausage shape, wrap in cling film and chill for at least 30 minutes, or overnight.
4. Baking time. Preheat the oven to 170C (340F) and line a baking sheet with greaseproof paper.
5. Take your cookie log from the fridge. Make 1/2 cm marks along it, then use a very sharp knife to cut clean slices. Like magic, your pattern should appear! Lay them on the baking sheet, and when the sheet is full, pop it in the fridge for 2 minutes.
6. Take the baking sheet from the fridge and put straight into the oven. Bake for around 10 minutes, but watch them as they will burn easily. I found the best way is to bake them for 5 minutes, then turn the tray round to get even colouring. Set the timer for 5 minutes, and keep a close eye on them – as the cookies are thin, those at the edges may bake more quickly than those in the centre. If they need more baking, leave them in for another minute, then check again – remove any which have a slight golden colour, then pop the rest back in for another miniute. I know this sounds fussy, but when you think of all the work that went into making them, you really don’t want to burn them!


A knowledge of how to make end grain chopping boards helps with these. Cut strips of 4 squares and flip alternative ones.. taste great for a woodworker learning to cook!
Sent from my iPhone
>
Hi Anne – that’s a brilliant analogy! I think you could be as imaginative as you wanted to be with these if you really put your mind to it. I guess you could even make the dough different colours and go for something really intricate.