- Home
- Windows Server
- Ask The Performance Team
- Windows Vista - Intro to Search
- Subscribe to RSS Feed
- Mark as New
- Mark as Read
- Bookmark
- Subscribe
- Printer Friendly Page
- Report Inappropriate Content
Windows Vista gives you more flexibility when you search and organize your files. New controls such as the Quick Search box and Enhanced Column Headers simplify managing large amounts of on-screen data in any way that you want. In this post we're going to cover some basic concepts of the new Search functionality in Windows Vista as well as go over a few quick "How To" steps.
Issues with previous versions of Search
-
Slow File Search:
File search in Windows was slow. In most cases the Indexing Service was either not enabled or not used by the Search Companion. As a result, a File Search can stress the hard drive while it “greps” through each file looking for matches.
-
Intrusive indexing: Previous attempts to index files interfered with use of the system. Indexing was CPU and I/O intensive, and did not provide effective ways to stay out of the user’s way.
- No E-mail Search: Today, the ability to search e-mail is equally important as the ability to search files. Many would argue that this is even more important! Indexing in Windows was previously focused only on files.
Terms and Concepts
The following terms and concepts are new or have been redefined in Windows Vista:
-
IFilters:
IFilters are used to convert various document formats to plain text. Some IFilters are written by Microsoft, while others are written by third parties such as Adobe Systems.
-
Shadow Indexes: Shadow indexes are indexes that Windows Vista uses until it can convert all of the indices into a single index called a Master Merge. IFilters read your files, breaking them into word lists. After a number of word lists have been created they are saved into shadow Indexes. If you abruptly power off your machine, the word lists have to be re-created, but shadow indexes already saved to disk survive reboots.
-
Master Merge: A Master merge is a collation of shadow indexes combined into a single index. The Master Merge runs automatically every 8 hours.
- Start Address: Start addresses are URLs that point to starting locations for indexed content. When indexing is performed, each start address is enumerated by a protocol handler to find the content to be indexed.
Searching for Programs
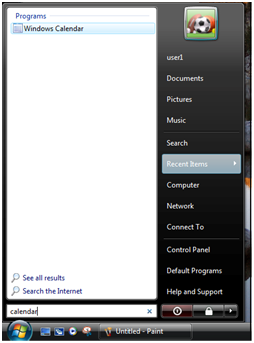
The Quick Search bar on the Start menu is immediately noticeable when you click the new Windows logo start menu. This search box allows a user to quickly search for programs on start menu as shown in the following figure.

To find a program from the Start Menu
-
Click in the Start Search box and enter the name of the program you wish to locate. The search will be performed automatically as you type the program name. Note: You may search for a program based on its name, or the name of the process (if it is known). For example, you could search for Microsoft Word or winword.exe and receive results that look slightly different but run the same program.
-
If any results are found, the Start menu will remove all other programs and only show the results of the search as shown in the following figure:
-
If no results are found, the Start menu will display No items match your search.
-
After each search, the See all results and Search the Internet options are displayed. One click on either of these options performs the accompanying action:
-
Clicking See all results will open a Windows Explorer window and display the results of the search.
- Clicking Search the Internet will automatically perform a search on the Internet and display the results in the browser. The search will be performed using the default Internet Explorer search provider.
-
Clicking See all results will open a Windows Explorer window and display the results of the search.
Searching for Settings
Finding and changing settings in Windows Vista is now a little bit more challenging due to the added complexity and new features of the operating system. Even in Windows XP, it was difficult at times to find specific settings that a user might want to modify. Since the Windows Vista user interface has changed and control panel applets have been renamed, removed, or combined, it quickly became clear that the ability to easily search for settings was needed.
Searching the Control Panel
The default Control Panel view is a category view that groups control panel applets into commonly used categories. The user can also select a classic view where each applet is displayed separately. However, these views do not necessarily indicate which category or applet should be used to change a specific setting. New users often spend quite a lot of time looking for settings that they want to change.
In Windows Vista, a new Quick Search bar in the Control Panel can be used to quickly and easily search for a setting using plain text.
To find a setting in the Control Panel
-
Open the Control Panel to display the default view.
-
Enter the setting that you are searching for in the Quick Search box located in the upper right corner of the window. It is not necessary to press Enter to begin the search. As soon as a match is found for the text, the results will be displayed as shown in the resolution search example in the following figure
- When you enter a search word, the display is quickly updated to show the category where the setting is located as well as a link you can use to change the setting.

Searching and Sorting Files
Finding your documents and files in Windows Vista is now easier than ever before. Search is integrated into the shell and the new sorting features use the power of Windows Search to make finding, displaying, and sorting files quicker and easier.
Searching for Files
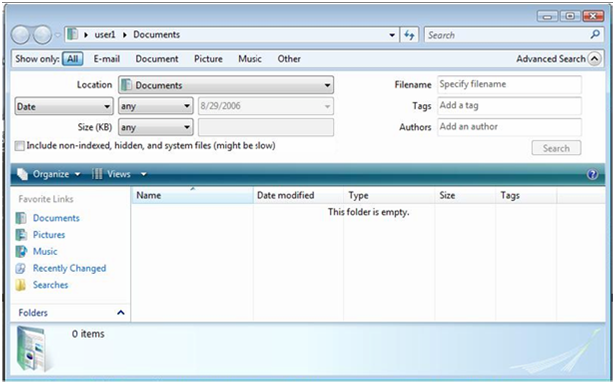
To search for files in Windows Vista, search from the Start Menu or open a Windows Explorer window and open the Search Pane. Opening the Search pane will also allow you to select the Advanced Search as shown in the following figure.
To search for files
-
Enter the filename that you wish to search for in the Quick Search box and Windows will search the current folder for the file and display the results.
-
To use Advanced Search, click the arrow next to Advanced Search and enter the following search criteria:
-
Select the location that you wish to search. The location, or scope of your search, defines what content will be searched. You can use the default locations of Everywhere or Computer to search the entire computer. You can also select Local Hard Drives, Indexed Locations, or Choose Search Locations to select a specific search scope location.
-
Select a Date range that you wish to search. Default is any date, but you can also select is, is before, or is after and then select a date from the calendar
-
Select a specific file size. Default is any, but you can also select equals, is less than, or is greater than and then enter a file size in kilobytes.
-
Enter the Filename that you wish to search for.
-
Enter a Tag that you wish to search for.
-
Enter a file Author that you wish to search for.
- Finally, click the Search button to search and display results.
-
Select the location that you wish to search. The location, or scope of your search, defines what content will be searched. You can use the default locations of Everywhere or Computer to search the entire computer. You can also select Local Hard Drives, Indexed Locations, or Choose Search Locations to select a specific search scope location.
-
Select how you want the results displayed. You can select All, E-mail, Document, Picture, Music, or Other.
- Enter Search text in the search bar and observe the displayed results.
Using Saved Searches
Windows Vista also has some default saved searches that make it easy to find documents, images, and music files.
To use saved searches
-
Open a Windows Explorer window.
-
In the left pane, select Searches.
-
Select the search that you would like to run from the right pane.
- The results will show in the middle pane as shown in the following figure.
OK - that just about covers the basics of the new Search features & functionality in Windows Vista. As you can see, Windows Vista has some powerful new search tools available. So until next time ...
Additional Resources:
- Windows Vista: Features Explained: Instant Search
- Catherine Heller's Blog: Programatically querying the Search Engine
- Shell Team on Channel 9: Exploring & Using Windows Vista
- TechRepublic Review of Windows Vista Integrated Search
You must be a registered user to add a comment. If you've already registered, sign in. Otherwise, register and sign in.