Film has always been the standard I measure against on the quality and color of digital imagery. The texture of grain with higher ISO, the colors rendered from the film — these are the characteristics I want my photos to take on. If you shoot RAW with digital cameras you get what most call the “digital negative”. This RAW file has all the data stuffed into it with no compression. The result is a larger image that you can fine tune more precisely.
In this RAW file you can see the noise/grain more clearly. With the right photo editing tools there’s a lot of information at your disposal that would not be as usable with a JPG. Normally the RAW option would come with cameras where the company finds would be most useful to the target audience. An expensive professional DSLR or high-end fixed lens mirrorless would be good examples.
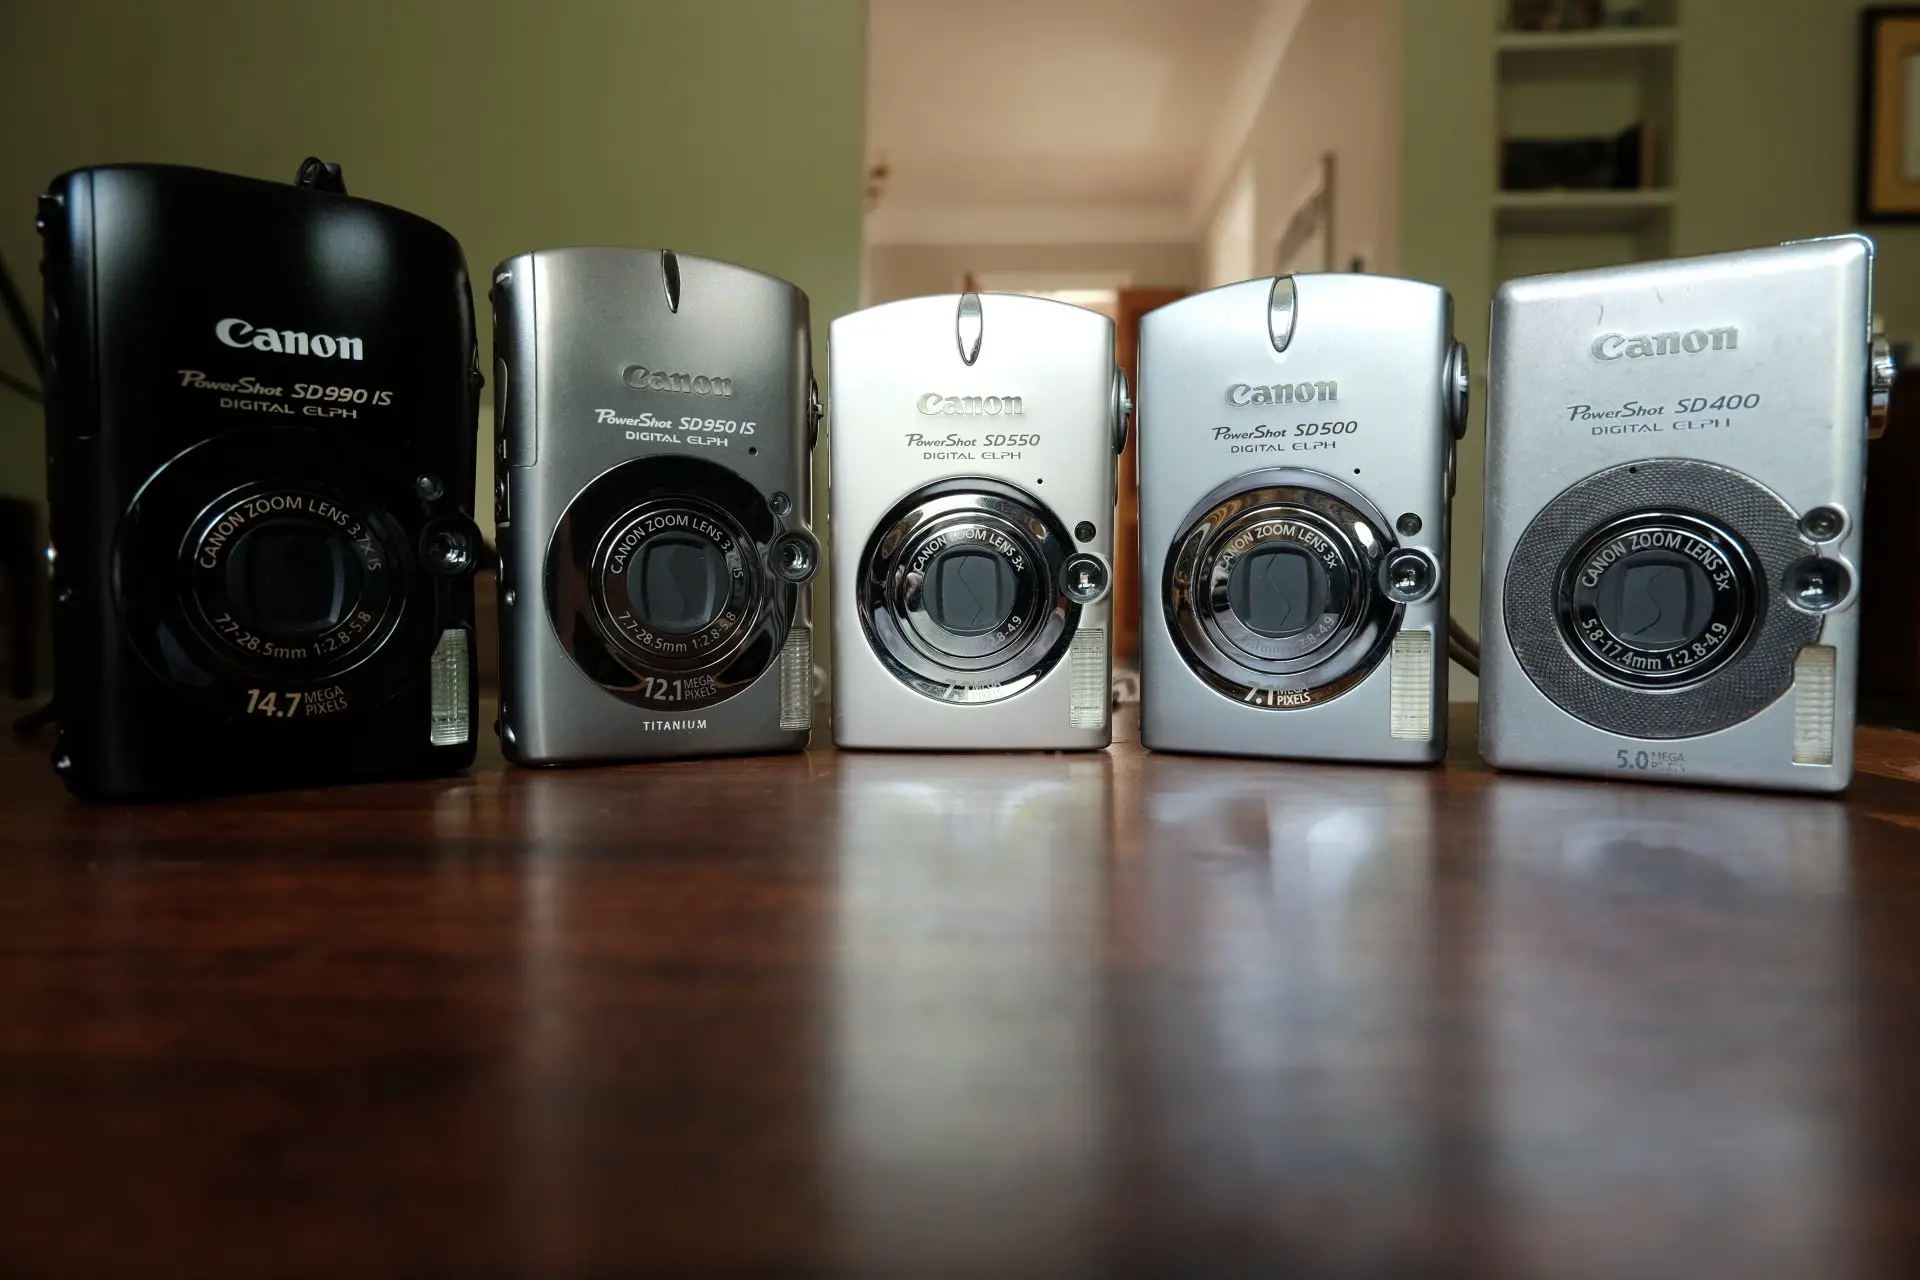
Sometimes though, you get a great camera where they left out the RAW option, and in my case the ultracompact Canon Powershot series. Getting just the JPG alone is a letdown most of the time. Fujifilm has done a tremendous job more recently of having their JPGs look amazing, while still giving the user a RAW option. Not all Powershots are missing this option. I have, for instance, the 2004 Canon Powershot S70. It’s a solid shooter, built like a tank with a sliding door in the front to protect the optics. However the next year they released the Canon Powershot S80 without RAW. Why?!
CCD Sensors
I really find that the old CCD sensors in these Powershots have a unique film-like quality. They seem to render grain more a tune to film than the CMOS sensors. Perhaps part of the reason is that there’s an analog aspect to how the sensor works and needs additional tech to convert from analog to digital. CCD has been noted by many as superior in better noise reduction, but I believe it was the speed factor (analog to digital) that moved many from CCD to CMOS.
My Hunt for a RAW option
What started me on the path of wanting RAW files on my Powershot was the SD400 that I purchased for my wife when it came out. She had abandoned it for her phone, so I decided to take it out on runs for street photography. It is so small I could easily hide it in my palm and turn the display off and randomly shoot while relying on it’s autofocus. The photos usually needed some edits but my options were very limited in color, so I would normally shoot monochrome.
Eventually the camera started failing after over a decade of solid use and being rained on. I picked its predecessor the SD500, a big improvement to the SD400 with a larger 1/1.8″ CCD sensor, yet still having an optical viewfinder. Alas, no RAW option so I took a look at Canon’s Camera Museum online. I investigated every camera in this series that was ultracompact and had an optical viewfinder, and none of them saved to RAW.
The power of Google got me on the right path. I started searching for ‘Canon Powershot RAW’ and ‘Canon Powershot SD500 RAW’ until I eventually found some camera tech board from years’ past where someone mentioned the acronym ‘CHDK’ as the answer, a term I had never heard before. CHDK stands for “Canon Hack Development Kit“. A temporary (meaning its not baked into the camera’s firmware), experimental (meaning no warranty, use at your own risk), and a free piece of software.
Canon Hack Development Kit to the rescue
CHDK is simple. You go to their website, search for your Canon Powershot camera, download the software if it’s available, and place the software on your SD storage memory card. You can either turn this software on by selecting the Print/Share/Alt button, or have it automatically load upon start (my personal recommendation). So the card contains the software that the camera acknowledges to use to really tap into what the camera’s computer can really do, one of which is giving you a RAW file!
Every digital camera is a mini computer that takes care of light balance, speed, aperture, and saves out a JPG. That JPG is created in-camera and usually you can choose the size of it in pixels and the quality (which has to do with how much compression is applied). But even the highest quality JPG at largest size can have its shortcomings since the camera decides what is ideal.
Where CHDK comes in handy is when you take a photo there is a RAW file the camera initially uses (in the case of Canon it’s a .CRW (Canon RAW)). For cameras with no RAW option, the RAW image gets deleted once the JPG has been saved locally, but with CHDK, the RAW file also can be saved locally. The file type that CHDK creates are native Canon CRW or Adobe DNG files (Digital Negative). According to Wikipedia, “Digital Negative (DNG) is a patented, open, lossless raw image format developed by Adobe and used for digital photography.” You can read more about RAW image formats here.
RAW vs JPG
The difference from the in-camera JPG and editing a RAW file can be quite an improvement. Below is an example of the JPG vs DNG taken with my Canon Powershot SD990.
Here you can see that a lot of detail was lost in the JPG and light balance was off. If you look closer you’ll also see that the compression has removed details in the photo too.
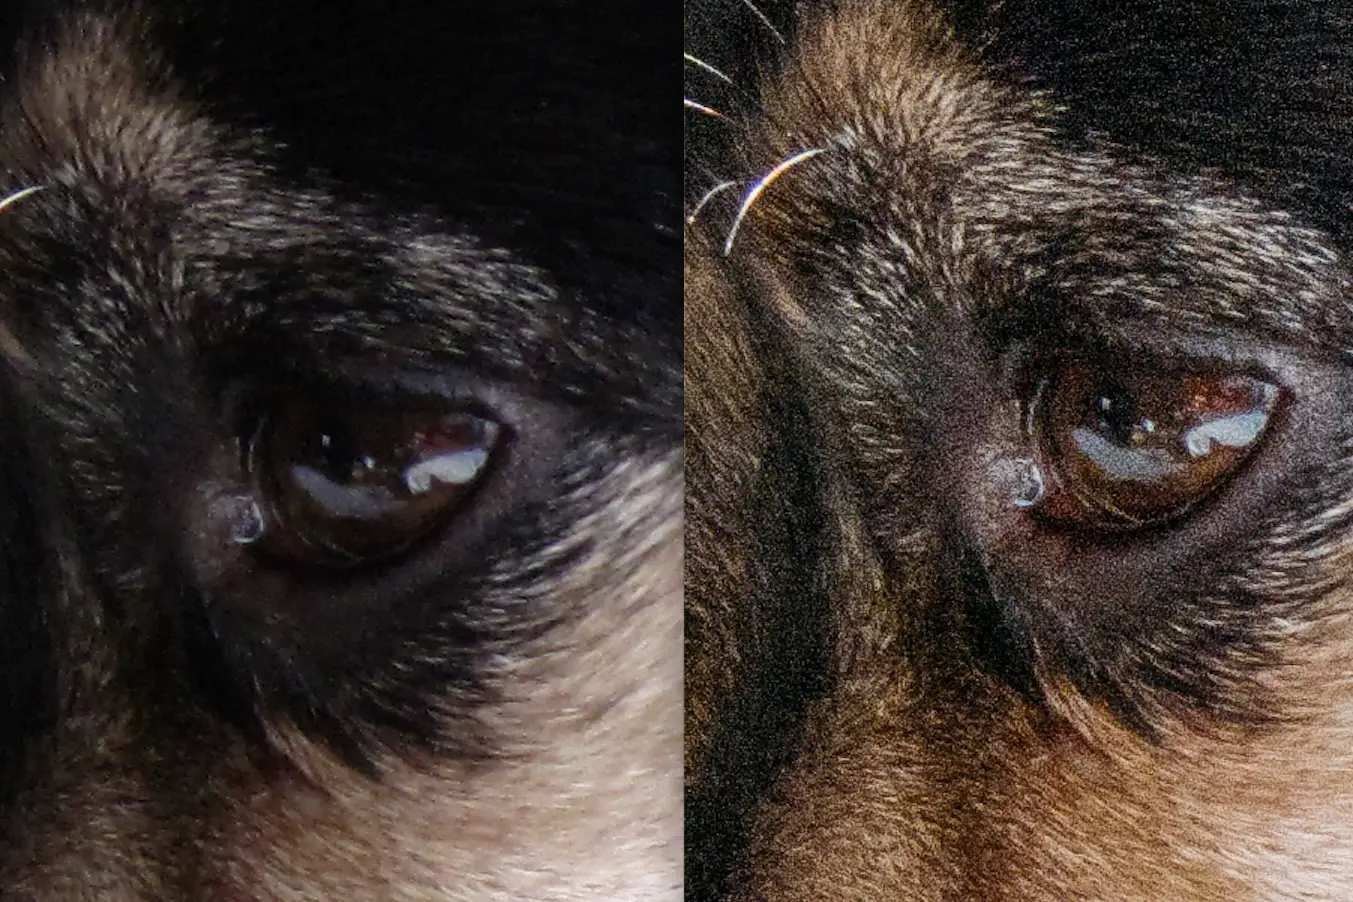
While you do see a lot of grain in the RAW file, this was taken on a 2008 Canon Powershot SD990 at ISO 400. At that time with the smaller 1/1.7″ CCD sensor, produced a very film-like grain-look as compared to the smudged version of the JPG on the left. In-camera JPGs receive noise reduction to smooth out that grain, but that can also create loss of detail which I personally do not like. Add to that if you try editing the JPG, you lose control of many possibilities in color and light in image editing tools.
Installing CHDK on your SDCard
Let’s move on, as I don’t want to exactly concentrate on RAW files, but rather I wanted you to know what was at the heart of why I use CHDK software. Aside from this feature, CHDK offers a ton of additional options including manual controls of exposure (shutter and aperture), live histogram, ND filter controls, grids, battery life, bracketing, and more than I care discuss in this article. Let’s take a look at what you see with CHDK on, and how to install this on your camera.
The Controls
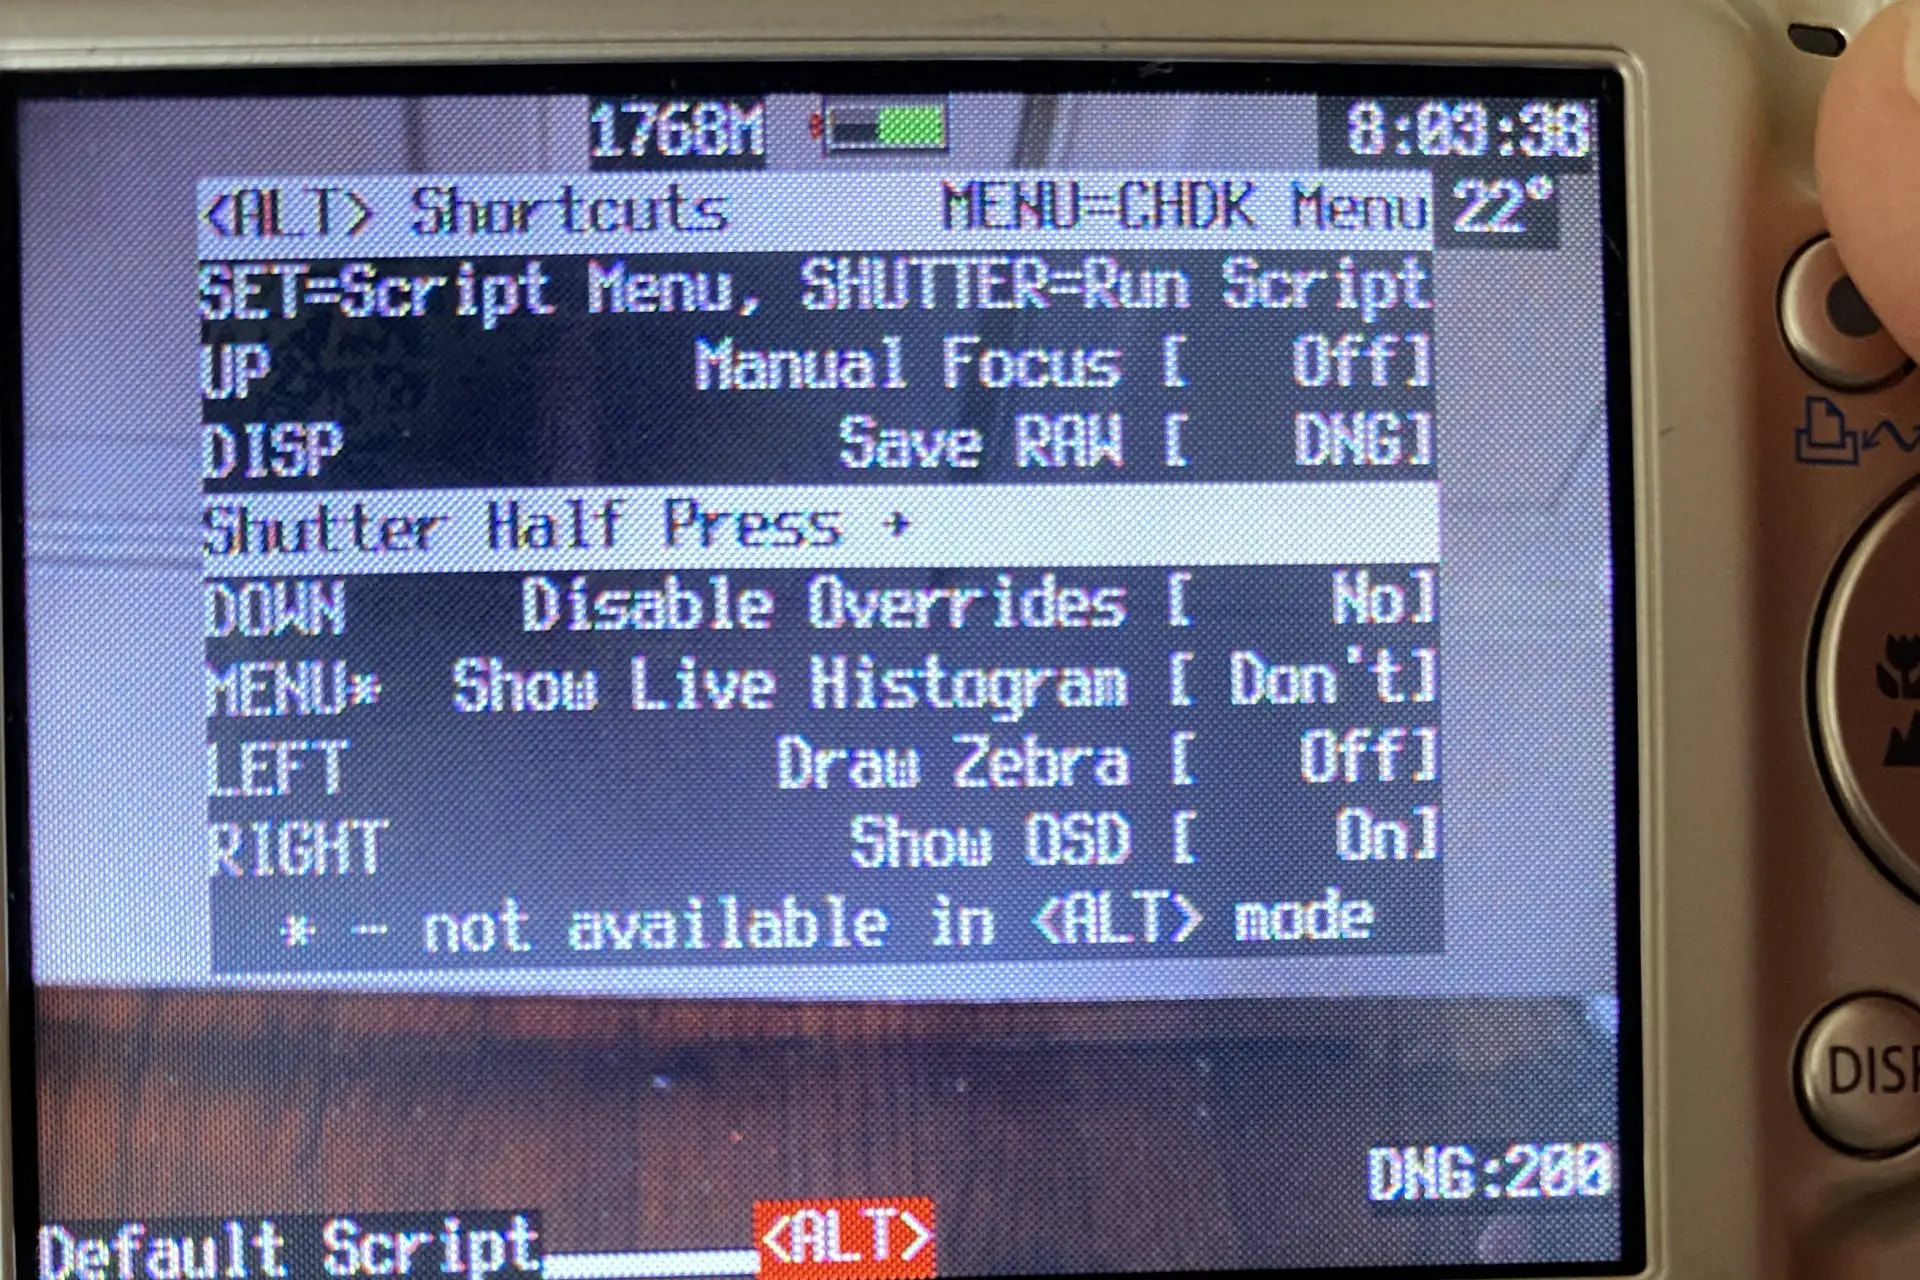
When CHDK has loaded onto your camera from the card, it’s not messing with the firmware and is temporary, meaning you can turn it off by simply either not having it autoload, or not selecting the Share/Print/Alt button, or using an SDCard that doesn’t have the software loaded. In this picture below my CHDK has auto-loaded, and by then choosing the Print/Share/Alt button I get a quick overview of whats currently running, one of which is the DISP Save RAW [DNG}.
If I then enter the controls I come to the Main Menu.
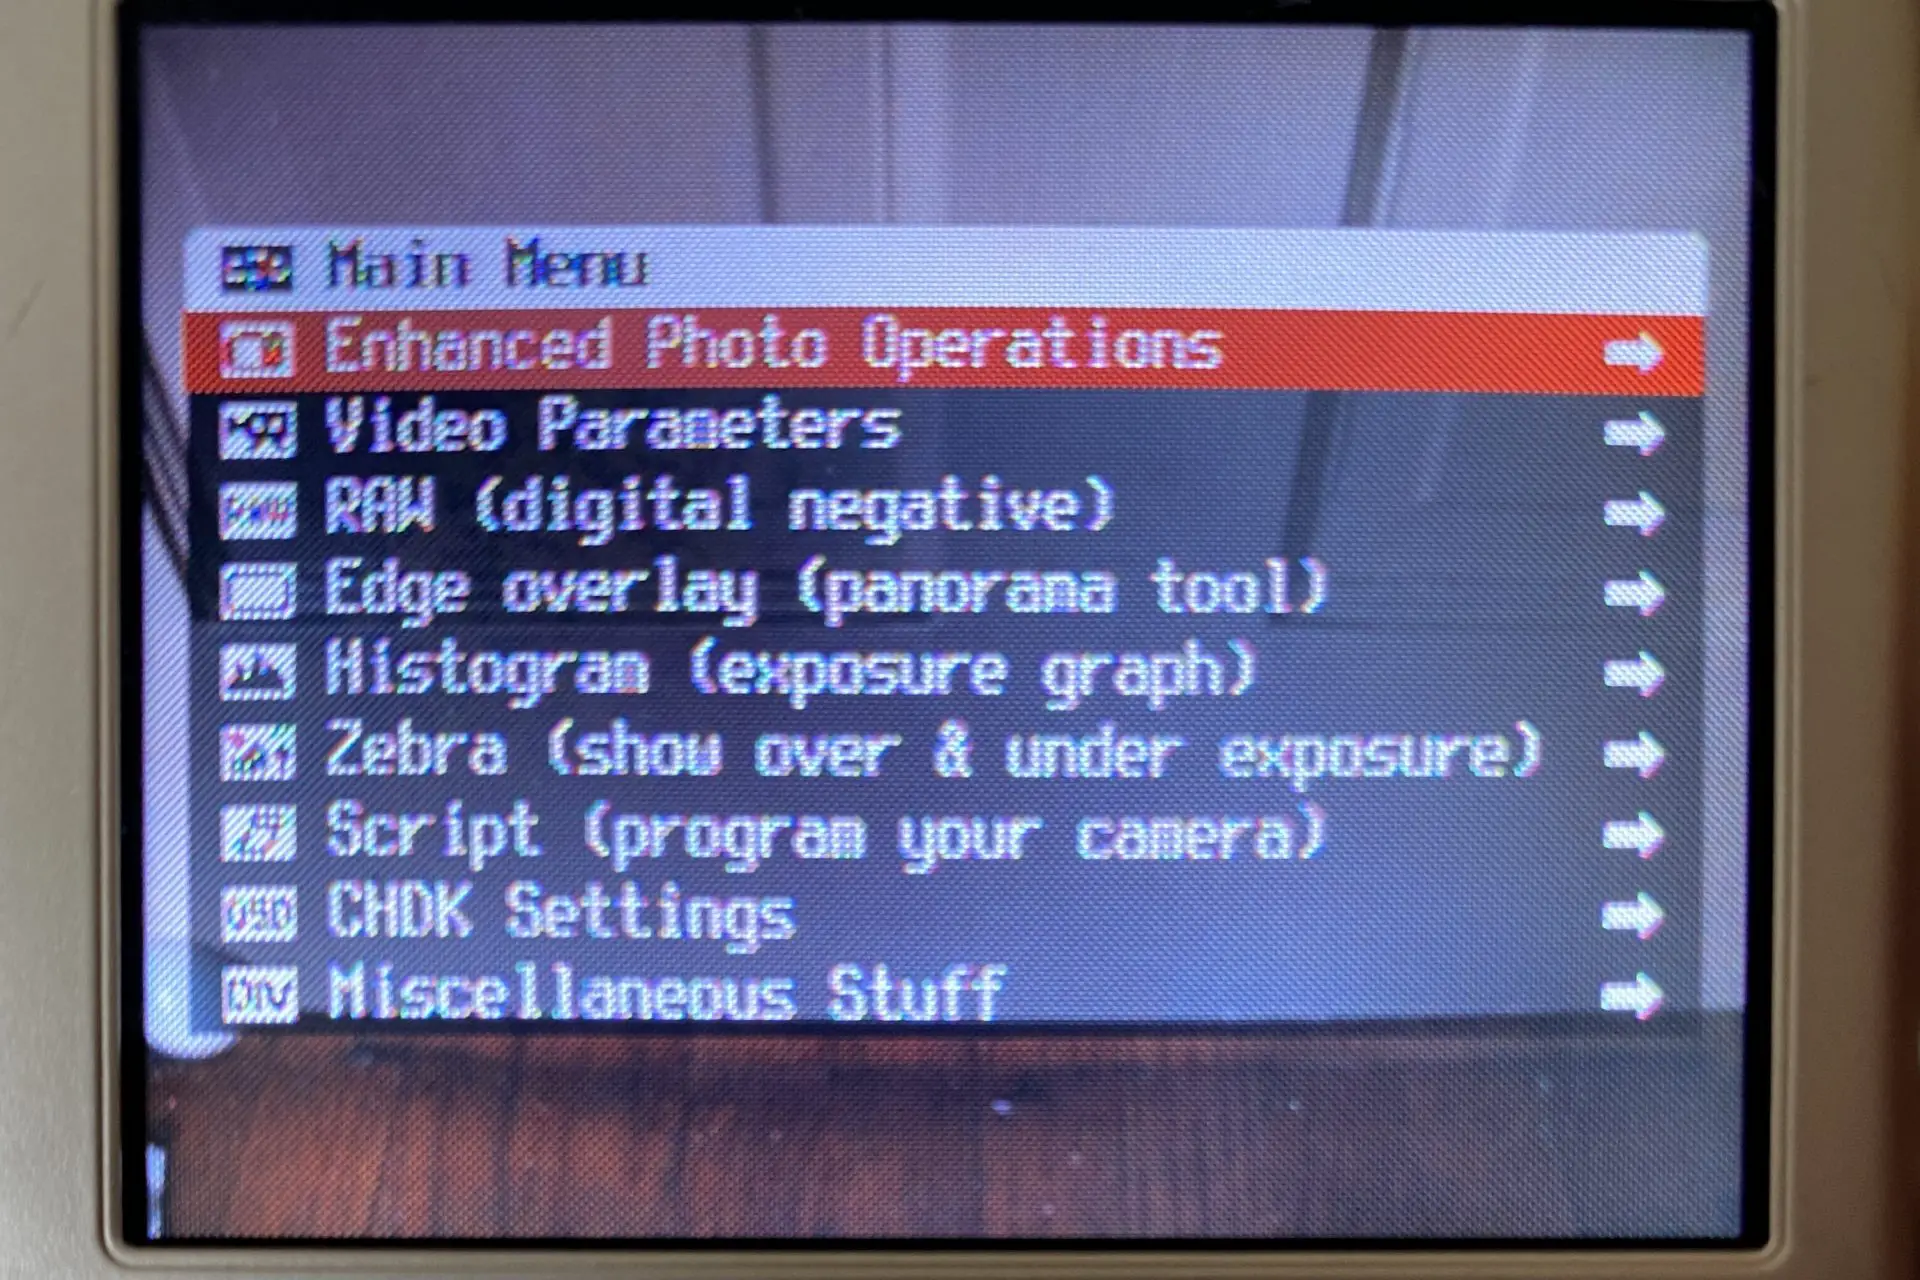
I can then enter the RAW (digital negative) option.
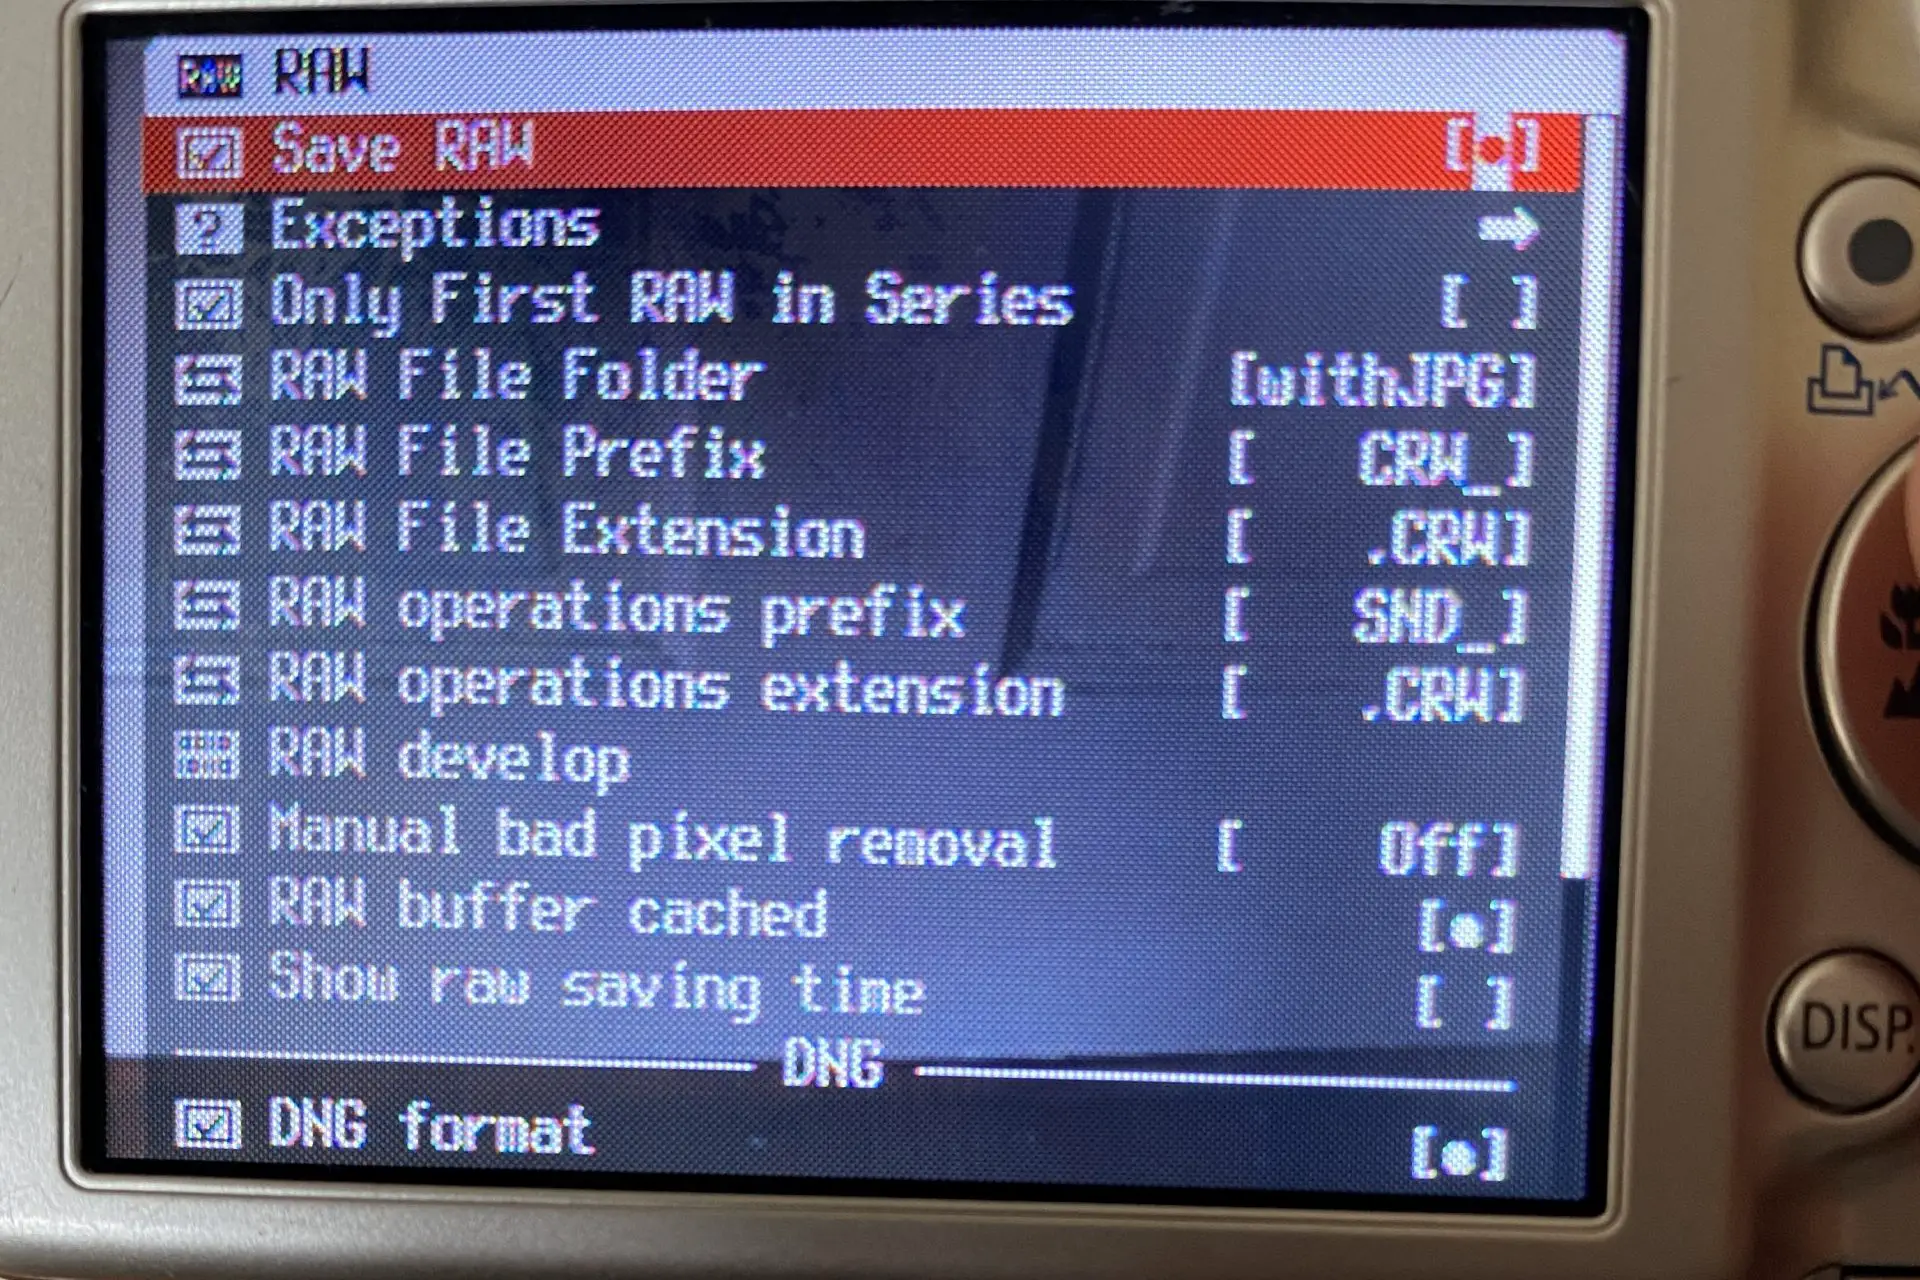
Here you can see where I have Save RAW turned on and at the bottom I’ve chosen DNG format since it’s more widely accepted by most software and in fact since I’m still using a very old Lightroom 5, the CRW version won’t open on my app, nonetheless it will on my PhotoScape X.
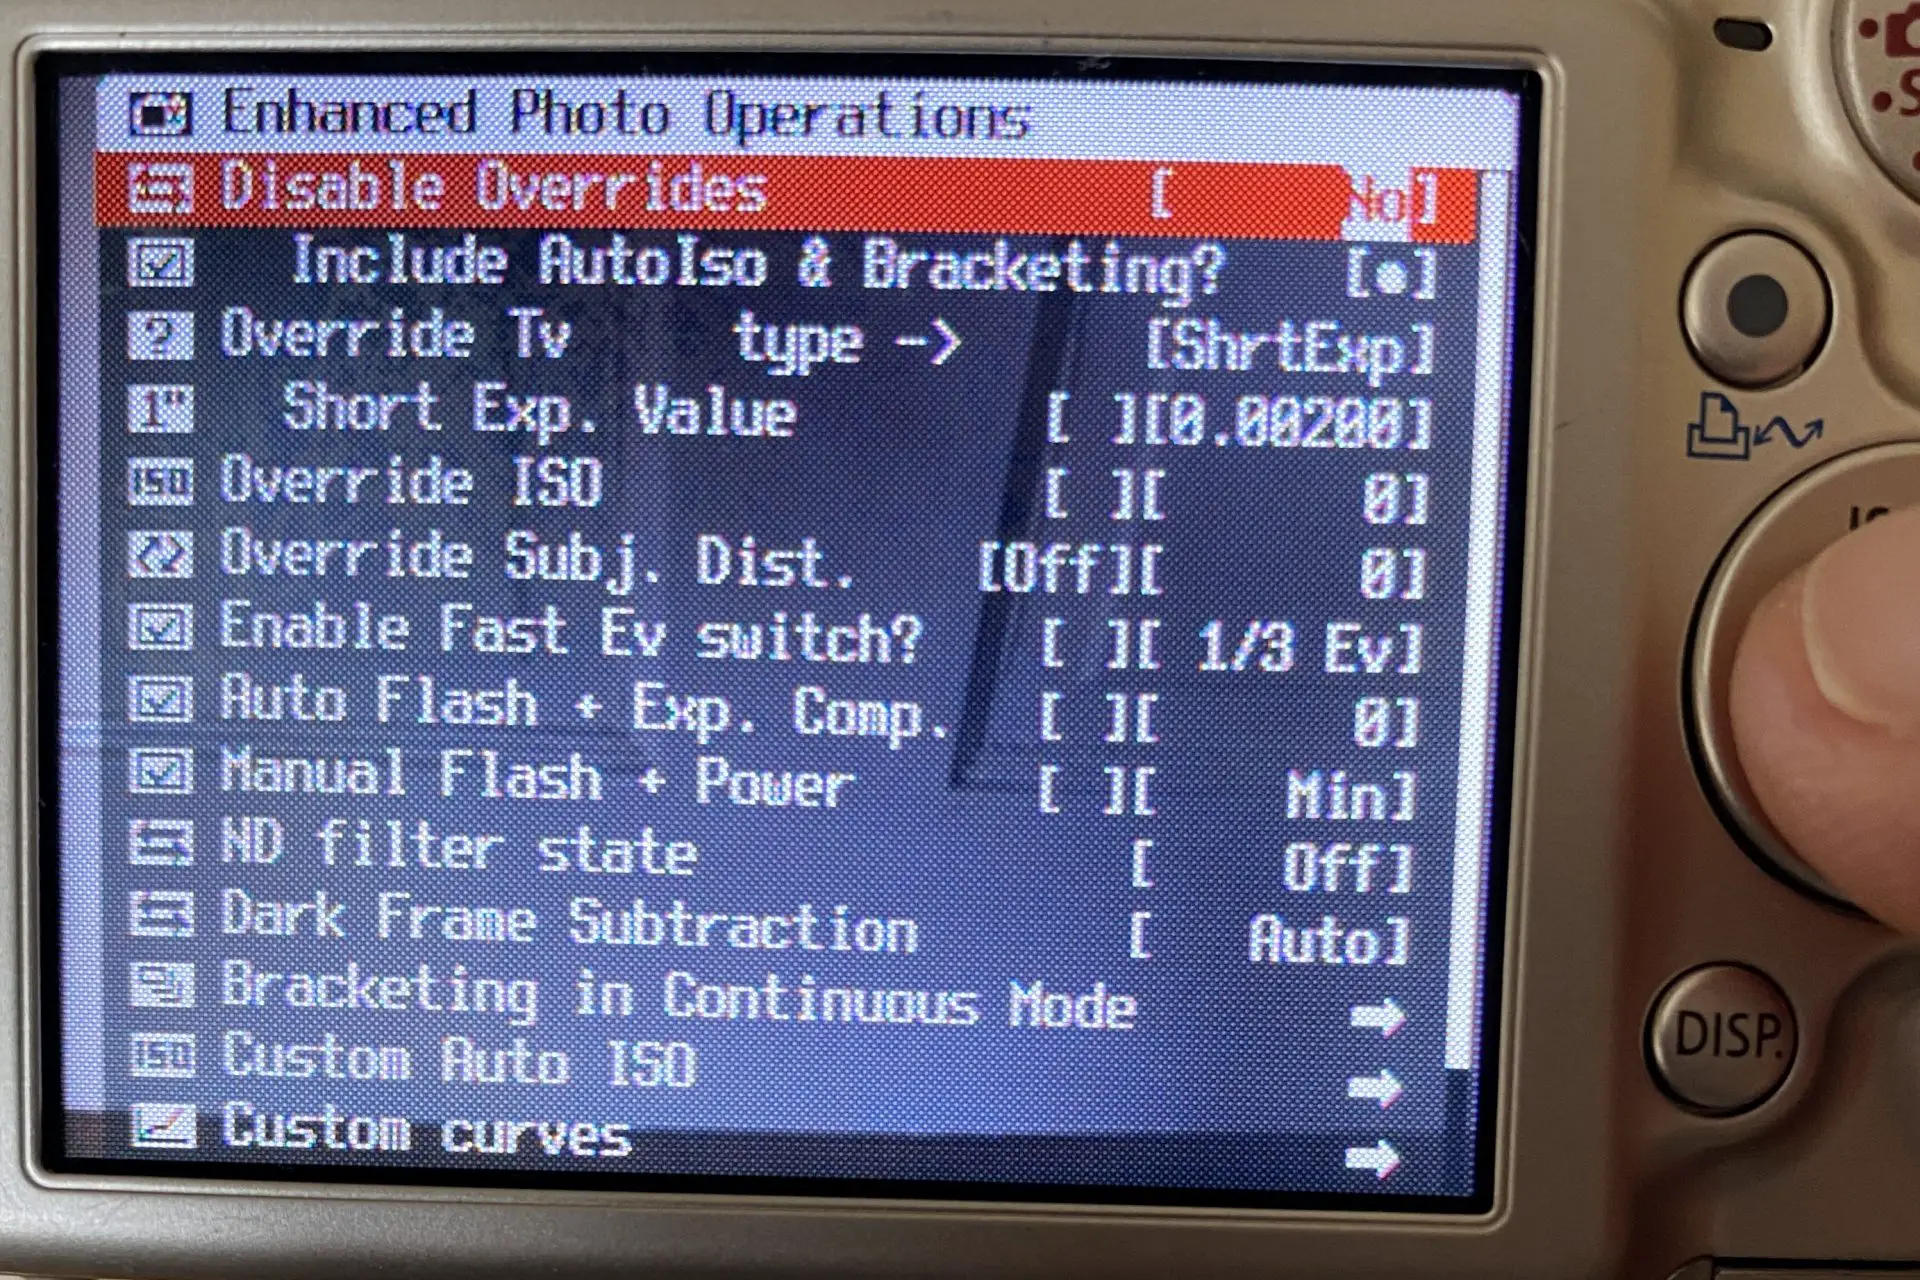
If I switch over to Advanced Photo Operations I can change the shutter speed (Short Exp. Value), turn ND filter state on/off and customize my ISO. So there’s really too much here to discuss, in short, as you can see, you have complete control over the camera.
So what was once a mere point and shoot travel camera could now be fine-tuned for things like sporting events where I can set the exact shutter speed.

Controlling the Shutter Speed (Tv)
After you install CHDK, come back to this section if you’re interested in controlling the shutter speed. This will make more sense after you get used to the menu system. Here are the steps:
- Choose Enhanced Photo Operation > Override Tv type -> [ShrtExp]
- Make sure Short Exp. Value dot is checked
- To increase/decrease each value in the set of 0.00000 choose left and right controls on your dial. To tab between each value in the set, press on shutter button. Below are the shutter speeds and corresponding numbers. Make your value change, then exit out of the menu system. It will save automatically.
1/1600 = 0.00050 | 1/1250 = 0.00070 | 1/1000 = 0.00100 | 1/500 = 0.00200 | 1/320 = 0.00300 | 1/250 = 0.00400 | 1/200 = 0.00500 | 1/160 = .00600 | 1/125 = .00700 | 1/100 = .00900 | 1/50 = .02000
Quick Guide to Installing CHDK
First off, although its completely safe to run on your old Powershots, I can’t be 100% certain that something would not go wrong. I have five of them with zero problems running the software from my SD cards. My SD Powershots were manufactured between 2004-2008. They are not expensive and I have nothing to lose, even if something did go wrong. So in short, I take no responsibility for your decision to try this out. Okay, now that I got that out of the way, here’s a super quick guide to getting it running.
Step 1: Go the Website
Go to the CHDK Fandom Wiki here. Do a search on the page for ‘Supported Cameras’. Some cameras will have multiple names depending on if you purchased in Europe, Asia, or the US. They’re the same camera, just different titles. If you have the Canon Powershot SD550, for example, you can click on IXUS750 (SD550) link for more info, but actually you want one of the firmware numbers next to it, so for this camera there’s 100f, 100g, and 100h. Before you do this, you need to get the correct SD Card.
Step 2: Using the correct SD Card
You’ll not want to use a card larger than 4GB. From CHDK website, “For cameras released prior to 2011, booting only works on FAT16 volumes. The maximum size for FAT16 is 4GB so using an SD card larger than 4GB is more complicated. ” So I kept it simple, I bought a pack of cheap 2GB cards which is plenty for these old Powershots.
Step 3: Figure out which firmware your camera is running
In order to know which firmware your camera is running, put a blank file at the root level of your SD Card called ver.req or vers.req. Then turn your camera on in playback mode and press the Func and Display button at the same time. You’ll see a display like what is shown below.
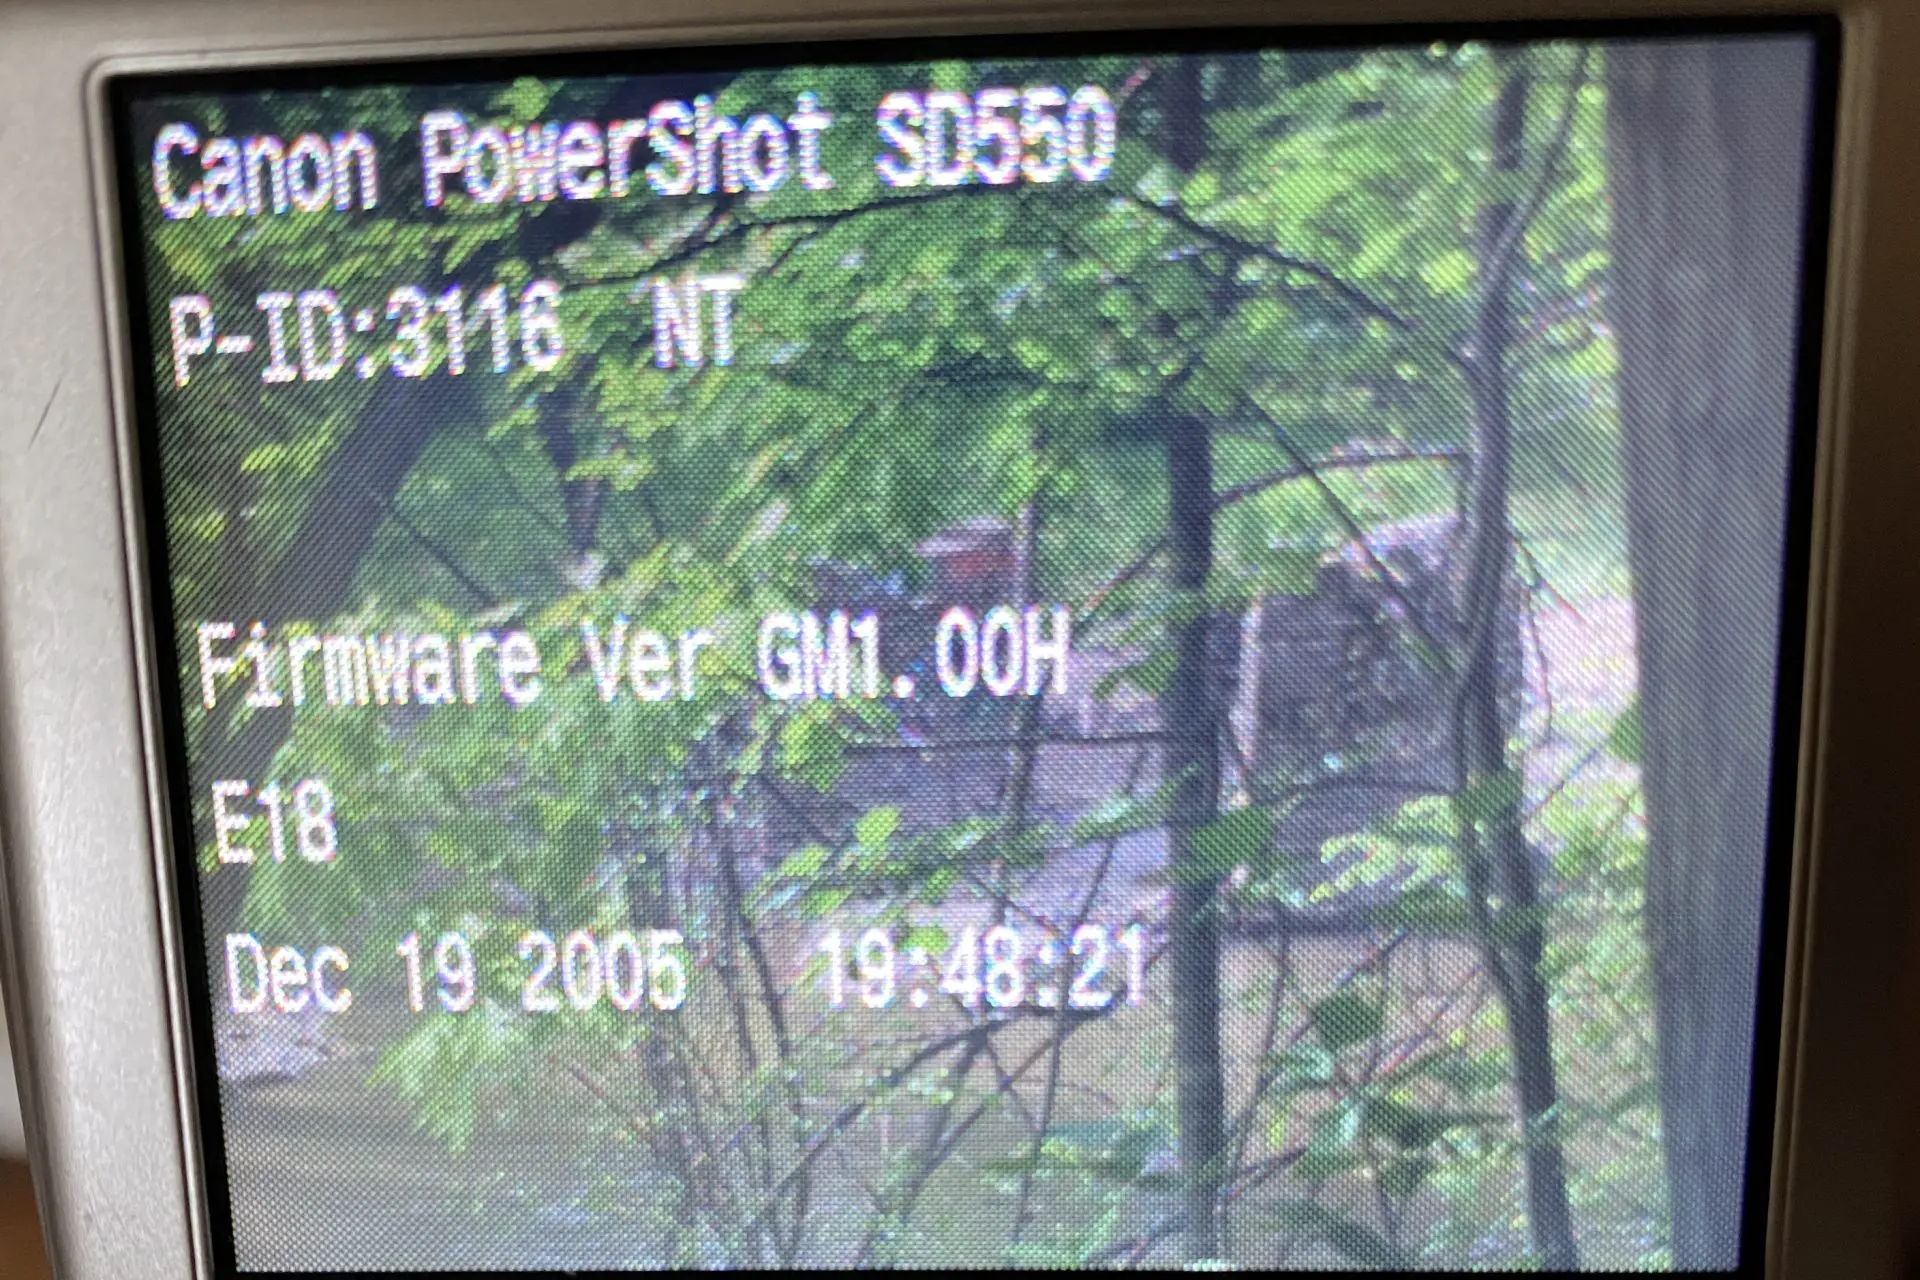
So for my camera, I have firmware 1.00H.
Step 4: Go to the Download Site
Now that I know my firmware version I’ll head over to CHDK-SVN Autobuild Download site by clicking here. I’ll do a search for Powershot SD550, look for my firmware number 1.00H and click on the link under the Complete column. I’ve never used Small as I would like to have all the options available. The Complete version has -full at the end of the zip file name. So I click that link (ixus750_sd550-100h-1.5.1-6085-full.zip) to download it (note this link name could change over time.
Step 5: Copy the folder contents onto the root directory of your SD Card
Inside each zip file are a series of files and a folder that looks something like this.
- camnotes.txt
- changelog.txt
- CHDK/
- DISKBOOT.BIN
- PS.FIR
- readme.txt
- vers.req
You probably already have the vers.req on your card unless you’ve reformatted it, nonetheless just copy over it. And that’s it!
ATTENTION MAC OS USERS!
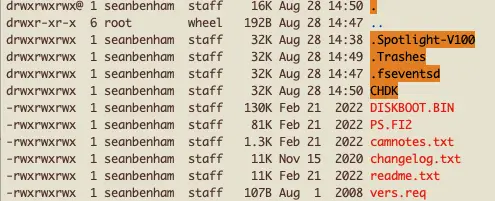
There’s an issue when copying CHDK to your FAT16 SD Card file system. The result is that Mac OS creates a dot underscore file as shown below. The CHDK folder, along with DISKBOOT.BIN, and everything else has a copy of the original with the dot underscore. This is a result of storing your files on a hard drive partition that doesn’t support extended file attributes. The solution is not to delete, but to use the xattr command to remove this attribute. Xattr is an abbreviation for ‘extended attributes’. Let’s fix this!

How to fix this
- In your Terminal go to SD Card by typing cd /Volumes/CANON_DC
- Do an ls -al command to list everything and you should see the dot underscore files
- Type, find . -print | xargs xattr -d com.apple.quarantine
- You’ll get a bunch of output, which you can ignore.
- To see if it’s been fixed, type ls -al again to confirm if those files were removed. It should look like the screen shot below. No more dot underscores!
That’s it, it’s fixed and will now work! If you would like to find out more, visit David Herron’s more detailed info on Techsparx.
Step 6: Running CHDK manually or on autoload
This is a personal choice, I always want to shoot RAW so I just have it automatically load when I start the camera. I first tried it out manually, meaning I had to initiate it manually to boot up, but that became tedious over time.
Before I go through the quick steps for each, here’s the complete long version.
Firmware Update Method (manually booting CHDK)
This method allows you to use your camera as you always had before, but if you want to boot CHDK, you have to do a series of small steps.
- Start your camera in Play mode (which is the reviewing photos option). On some cameras there’s no separate play selection just a play button. For these models like the SD950 do not use on/off button, but the actual play/review button to start up the device. With the SD550, just turn the selector to Play, then press the on/off button.
- Next press the Canon Menu key and scroll down until you see “Firm Update…”. It might not be visible on the first screen but down below the first set of options.
- Next select “Firm Update…” followed by the camera asking “Update firmware version?”. Press OK.
- The CHDK splash screen will appear briefly on the camera’s screen and now you’re ready to go!
Bootable SD Card Method (autoload method)
In this method an additional one time set of steps needs done. If you decide to not do this method down the road it’s as simple as unlocking your card.
- Turn on CHDK using the steps above for Firmware Update Method
- Hit the Print/Share/Alt button followed by the Menu button.
- Scroll down to Miscellaneous Stuff and then scroll right.
- Scroll to SD Card and scroll right again
- Select ‘Make Card Bootable…’
- Once selected, turn off you camera and lock your SD Card. Locking it will not affect deleting your images as it ignores the DCIM directory.
- That’s it!
Welcome to the enthusiasts version of your camera
From here you’ll need to use the CHDK Fandom website to research more of your questions. I mainly just use the manual overrides for speed and aperture and always have it save a DNG file. I have mine to load when I power it up and will always serve me both the JPG and DNG versions (turning off the JPG might not be an option). If you have any questions shoot me a comment below. Feel free to correct me or improve on what I wrote.
Conclusion
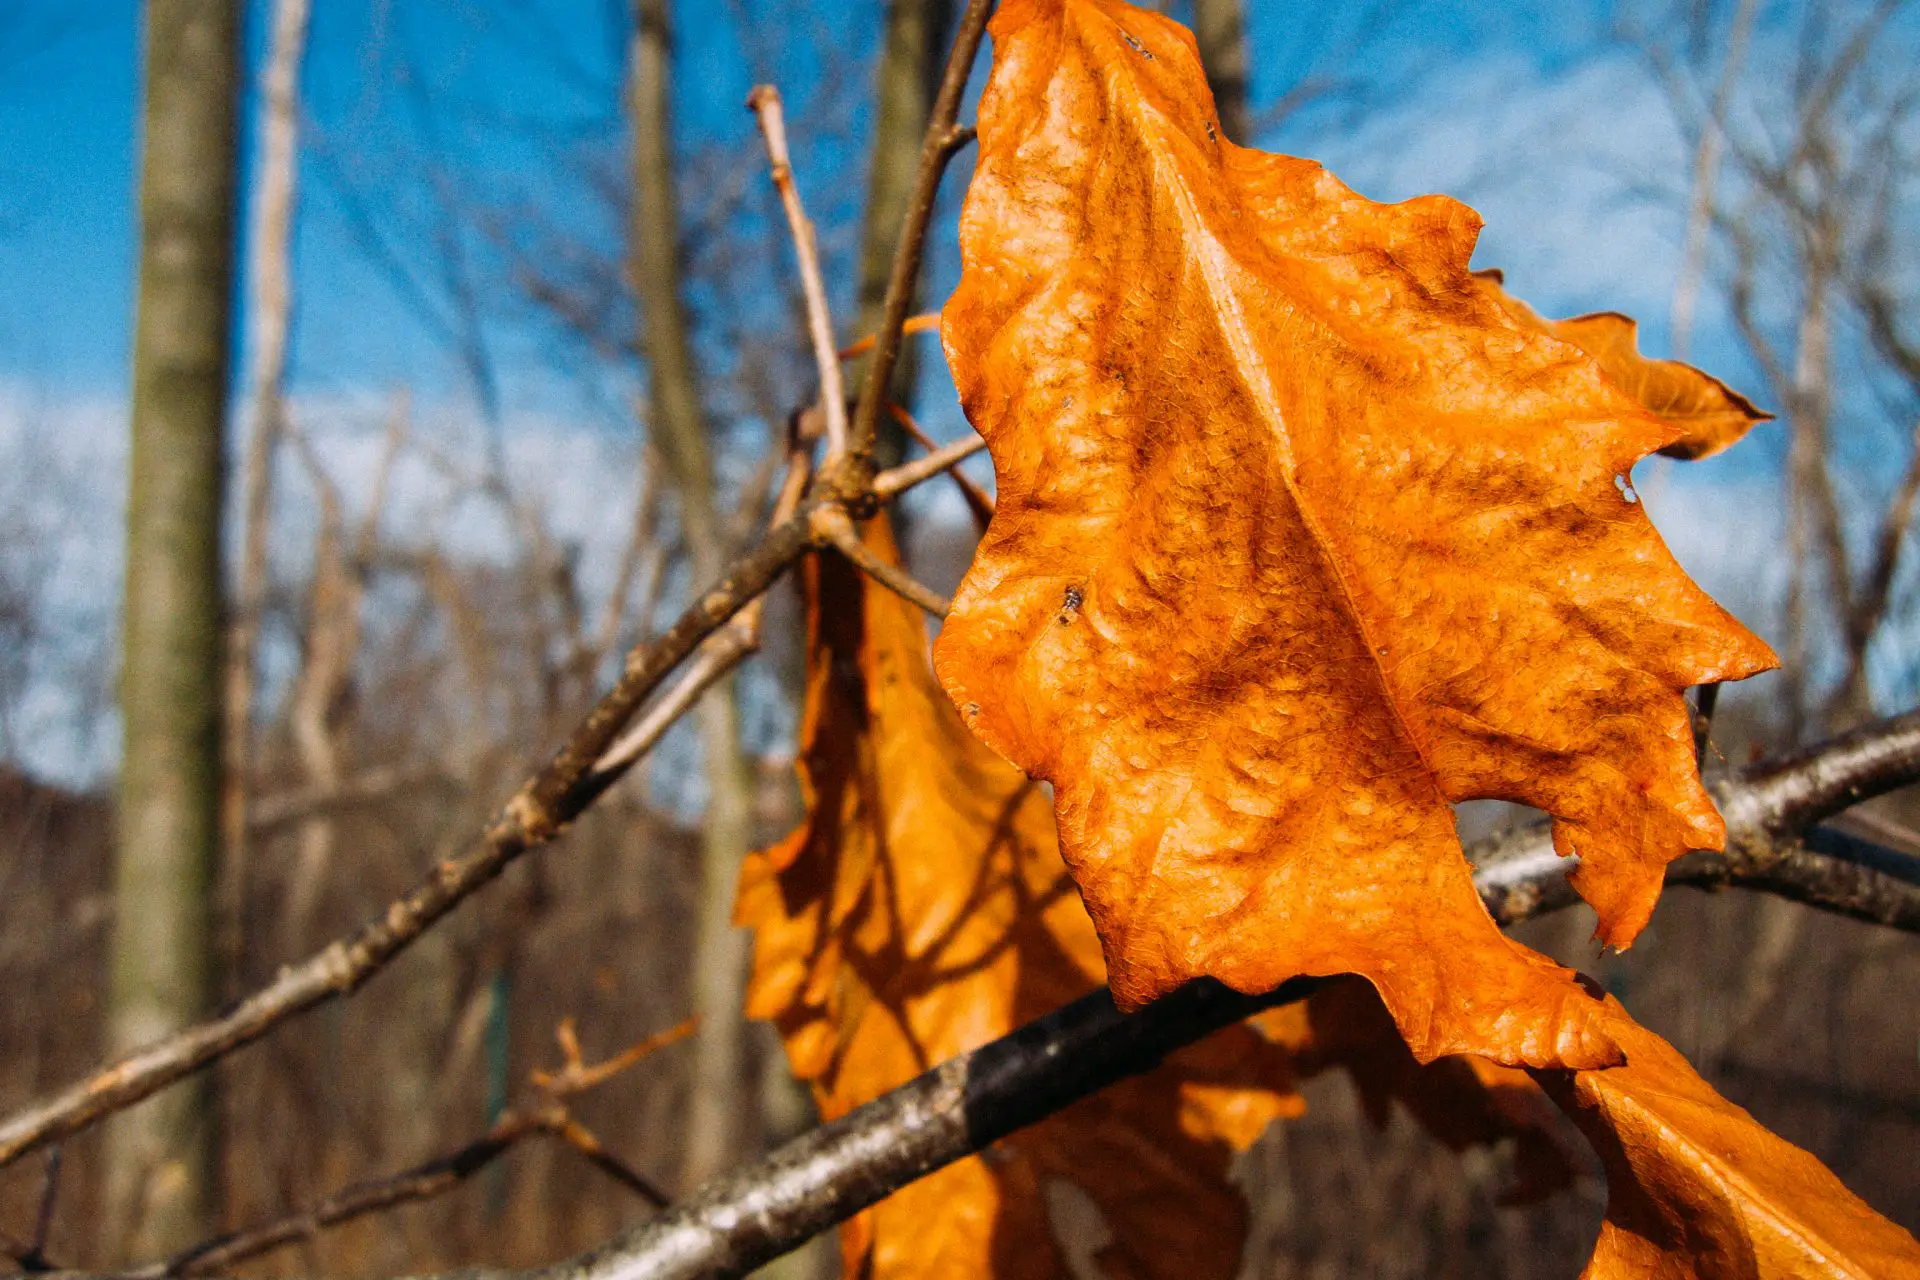
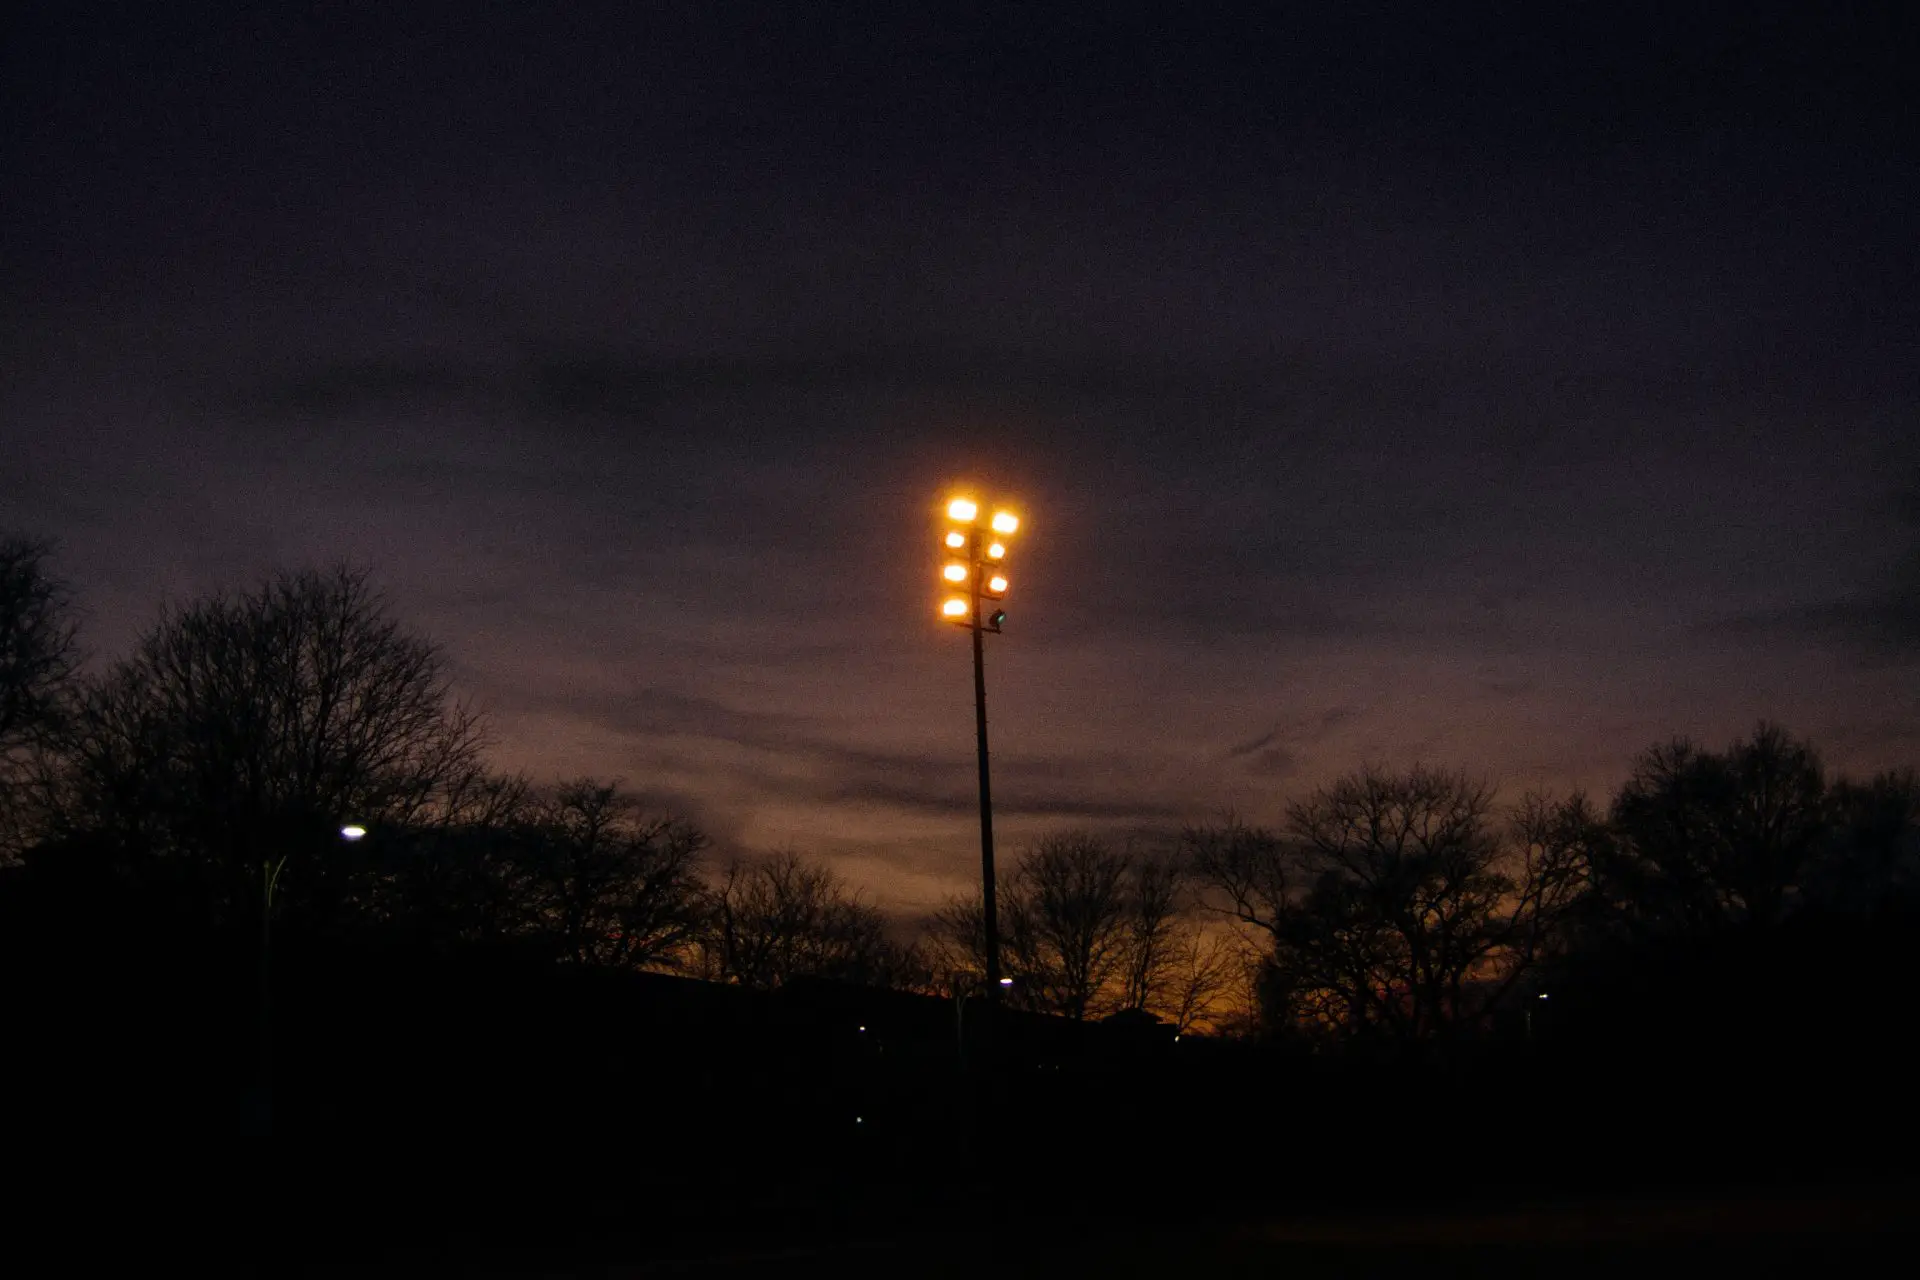
Thanks for checking out the article! CCD sensors rock and the Powershots have better image quality than what the JPGs show! Below are some of my favorite shots taken on a variety of Powershots, saved as DNG files and edited, mostly, in Lightroom.


Thank you. To see more of my work, please visit my Instagram page.
Share this post:


Comments
Kurt Ingham on Digital Negatives – The Power of CHDK on Canon Powershots – By Sean Benham
Comment posted: 13/06/2022
Comment posted: 13/06/2022
Comment posted: 13/06/2022
Comment posted: 13/06/2022
vlad on Digital Negatives – The Power of CHDK on Canon Powershots – By Sean Benham
Comment posted: 13/06/2022
Comment posted: 13/06/2022
Marius on Digital Negatives – The Power of CHDK on Canon Powershots – By Sean Benham
Comment posted: 13/06/2022
I can't wait to exume my old Canon and install CHDK now !
Comment posted: 13/06/2022
Vlad Serebryany on Digital Negatives – The Power of CHDK on Canon Powershots – By Sean Benham
Comment posted: 13/06/2022
Comment posted: 13/06/2022
davesurrey on Digital Negatives – The Power of CHDK on Canon Powershots – By Sean Benham
Comment posted: 13/06/2022
Regarding CCD vs CMOS sensors, in theory at least CCD sensors have less noise for a given illumination; in fact they are usually used in astronomical observations. CMOS sensors consume less power, have less vertical smear (overload) but the big difference is the way the sensors are read out.
CMOS can be read much faster which has become an important attribute today but the way it does it, effectively line by line, can give rise to skewed verticals, a rolling shutter effect. CCDs however use a global shutter technique for read out, which is more like how a slide is exposed, all parts simultaneously.
But perhaps most importantly CMOS has won the race over CCDs as the former are much cheaper to fabricate, on similar lines to those used for other ICs.
So both are analog devices in that they convert light into electric charge (photons to electronics) in an analog way. It’s just the way the charge is read out that is different.
Okay, I’ve made a lot of generalisations in the above but I hope it gives some folk here an idea of the differences.
Comment posted: 13/06/2022
Comment posted: 13/06/2022
Comment posted: 13/06/2022
Daniel on Digital Negatives – The Power of CHDK on Canon Powershots – By Sean Benham
Comment posted: 13/06/2022
Thanks for sharing what had been a long and highly directed and motivated effort. An interesting and informative read.
Regards
Daniek
Comment posted: 13/06/2022
John Furlong on Digital Negatives – The Power of CHDK on Canon Powershots – By Sean Benham
Comment posted: 14/06/2022
I shall have to supress an attack of GAS to prevent me going down a Canon 'rabbit hole'...
Cheers,
John F.
Old Canon on Digital Negatives – The Power of CHDK on Canon Powershots – By Sean Benham
Comment posted: 28/08/2022
Comment posted: 28/08/2022