Heading out the door? Read this article on the new Outside+ app available now on iOS devices for members! Download the app.
After summiting, it’s easy to feel like the challenge is over and all that remains are a few simple raps. Your situational awareness and risk perception change, distracting you from the necessary tasks. But even small mistakes can be fatal. In fact, most climbing deaths happen during rappels. As a member of Yosemite Search and Rescue (Alexa) and a Yosemite Mountain Guide (Miranda), we teach a safe, reliable system and encourage basic rope-ascent skills for safer rapping.
Pre-climb preparation
Research your options. Is there a walk-off? Walking off eliminates the risk of human error. If you must rappel, research: Where are the raps? Will you need one rope or two? What are the anchors? Is there loose rock? Is the terrain overhanging or traversing?
Checklist
Always carry the following items for rappelling:
- Descent-control device, like an ATC, with a guide-mode option
- 1 meter of 5mm or 6mm cordelette to use as a “third hand”
- Personal anchor system for clipping in at stations
- An extra prusik (1-1.5 meter cord) for rope ascent
- 2-4 shoulder slings (leg loops)
- Cordelette (to replace tat)
- Belay knife for cutting tat or a stuck or damaged rope
Setting Up For Your Rappel
Threading The Rope
If rappelling with one rope, thread your rope and pull it through until the middle mark is at your anchor. If your rope lacks a middle mark, thread one end, marry it to the other, and then pull the rope through, coiling as you go, putting the midpoint at the anchor. If rapping multiple times, mark the middle with tape or chalk.
For double-rope rappels, have two ropes similar in diameter. Thread the thinner rope through the anchor (this will make the ropes easier to pull) and tie the ropes together. We recommend the flat overhand (see sidebar at bottom). This low-profile knot keeps the rope flat, making it less likely to stick while pulling.
Extended Rappel Device with Friction-Hitch Backup
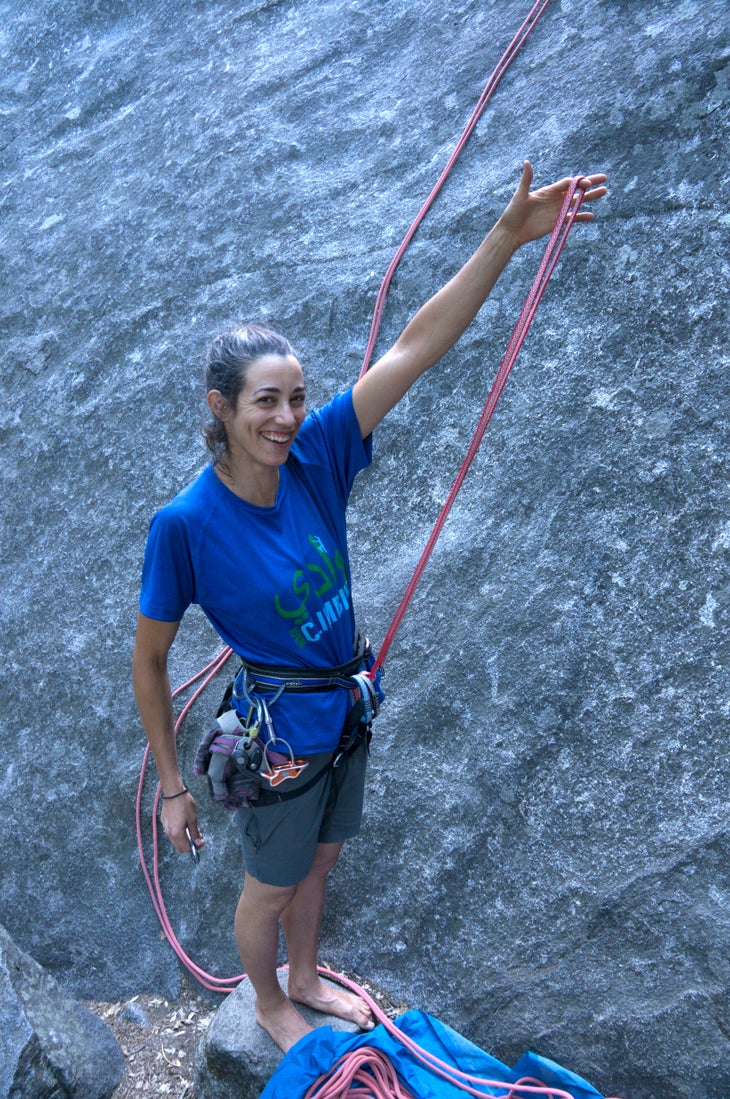
Extending a guide-mode device lets you easily switch from rapping to ascending. The extended device also makes it easier to pre-rig rappels without climbers above getting pulled around by the rope. The friction hitch is your “third hand” backup.
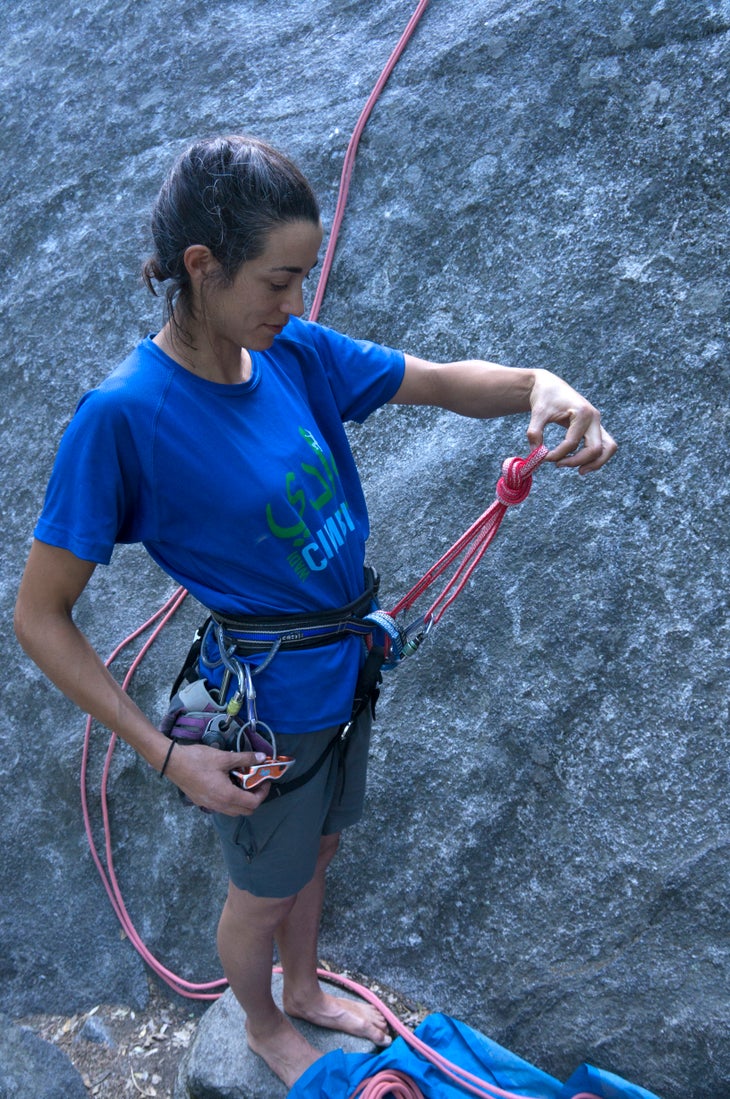
To extend your device, use a double-shoulder-length sling or your personal anchor system (PAS). Girth-hitch the sling through the two tie-in points on your harness and snug it up, keeping the bar tack close to your belay loop (fig. 1). Fold it over on itself and clip the other end of the sling into your belay loop with a locker. Now tie an overhand on a bight in the middle of the sling (fig. 2). Clip the rap device into this knot (fig. 3). With a PAS, clip your rap device a few links up from your harness.
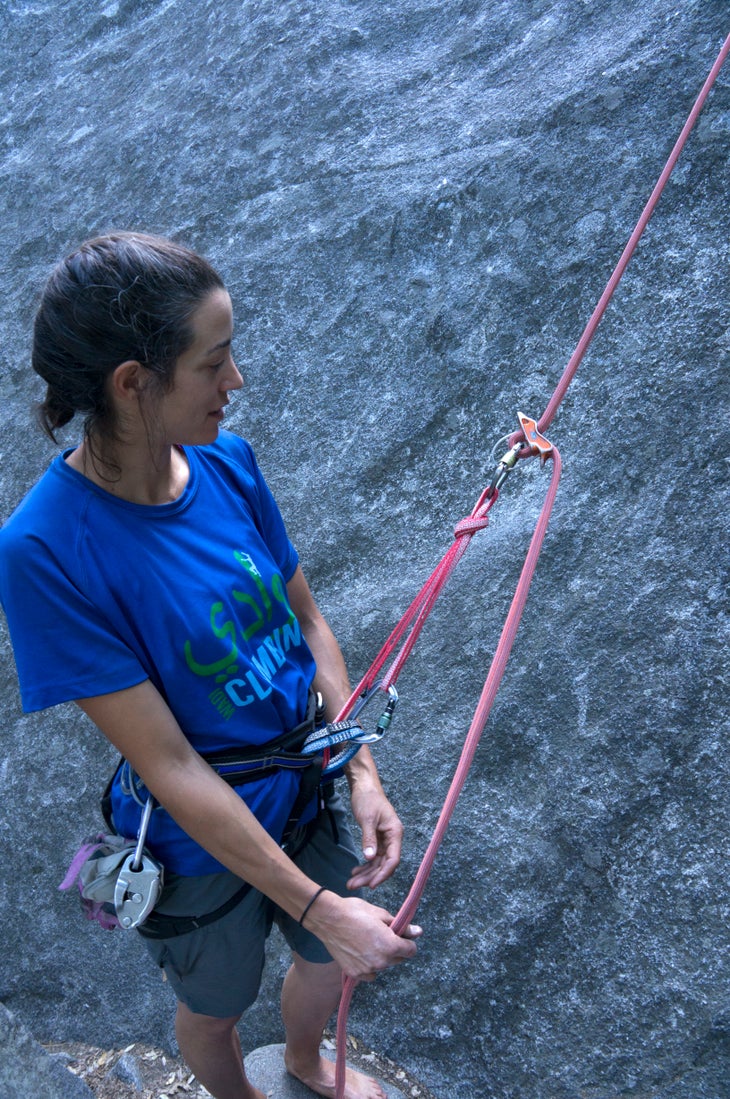
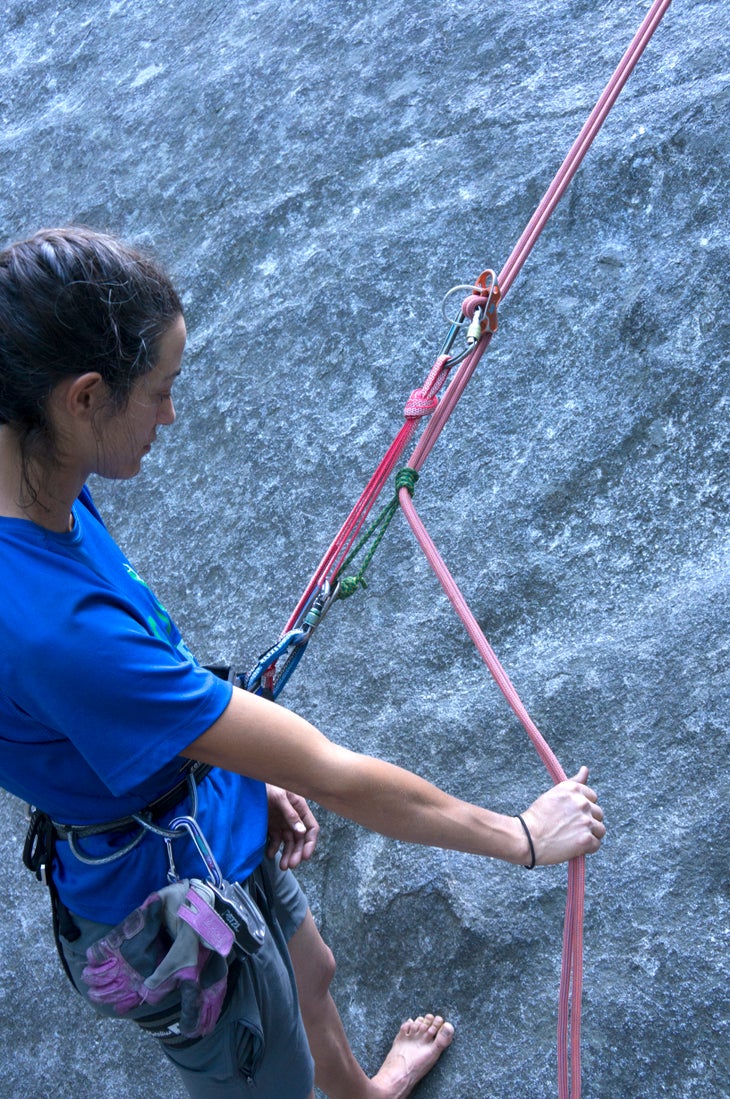
To make your third hand, girth-hitch your prusik around the rope at least three times and use a locking biner to clip it to your belay loop (fig. 4; if not extending your rappel, clip it to your leg loop). Dress the prusik and lock your biner. To test, weight the hitch while still clipped in. Never rely on one friction hitch! If you need to let go of the rope, tie a backup knot a foot below your hitch.
Saddlebags
This technique helps on low-angle and featured terrain or windy days. Though you should always tie stopper knots in your ropes, dropping them 100 or 200 feet can cause problems. To combat this, use “saddlebags”: Once the ropes are threaded, tie their bottom ends together in an overhand on a bight and clip this to your harness. Coil the ropes from the knot upward, creating a saddlebag by attaching a shoulder-length sling to a gear loop and hanging the coils through this. Pull out the coils as you rap.
The Next Anchor
Do not release the ropes once you’ve reached the next anchor: You may not be able to reach them again. Here’s a better way: The first climber raps and clips in direct to the anchor; she feeds out 5–10 feet of slack through her rap device, leaving the device on the rope. She yells, “Off rappel!” and begins threading the end of the rope they’ll be pulling. With the extra slack, climber no. 2 has enough loose rope to rap. Once at the anchor, she clips in and both climbers take their devices off the rope, holding onto both sides of the rope or clipping them through a carabiner into the anchor. One person can pull the rope while the other threads.
One caveat while pulling: The force of the falling rope can pull the rest of the rope with it, leaving both climbers stranded. If the middle of the rope or the knot is already at the anchor, the first person can set up her rappel before the rope starts to fall. Alternatively, clove hitch one side of the rope to you or your anchor.
Pre-Rigged Rappels
This technique allows the first person rappelling to double-check the second’s set-up, useful if climber no. 2 is less experienced. Have both people set up their rappel at once, devices extended. The “top” climber (second to rap) sets up her device snug against the anchor. Meanwhile, the “bottom” climber (first to rap) sets up her rappel on the brake-hand strands just below the top climber. The weight of the first climber will lock the second in place. Once the first climber unweights the rope, the second can rap.
Ascending the Rope
If you rapped past your station, your rope got stuck, or you’re dangling in space, you’ll need to ascend the rope.
This technique assumes you have a guide-mode device extended and a third-hand friction hitch. Third hand engaged, tie an overhand on a bight a couple feet below it and clip this knot to your belay loop with a locker. This is your backup. Now, with a locker, clip the guide-mode attachment point to your belay loop and unclip the rap point from your harness (do not unclip the rope from the device). The device should be in auto-locking mode.
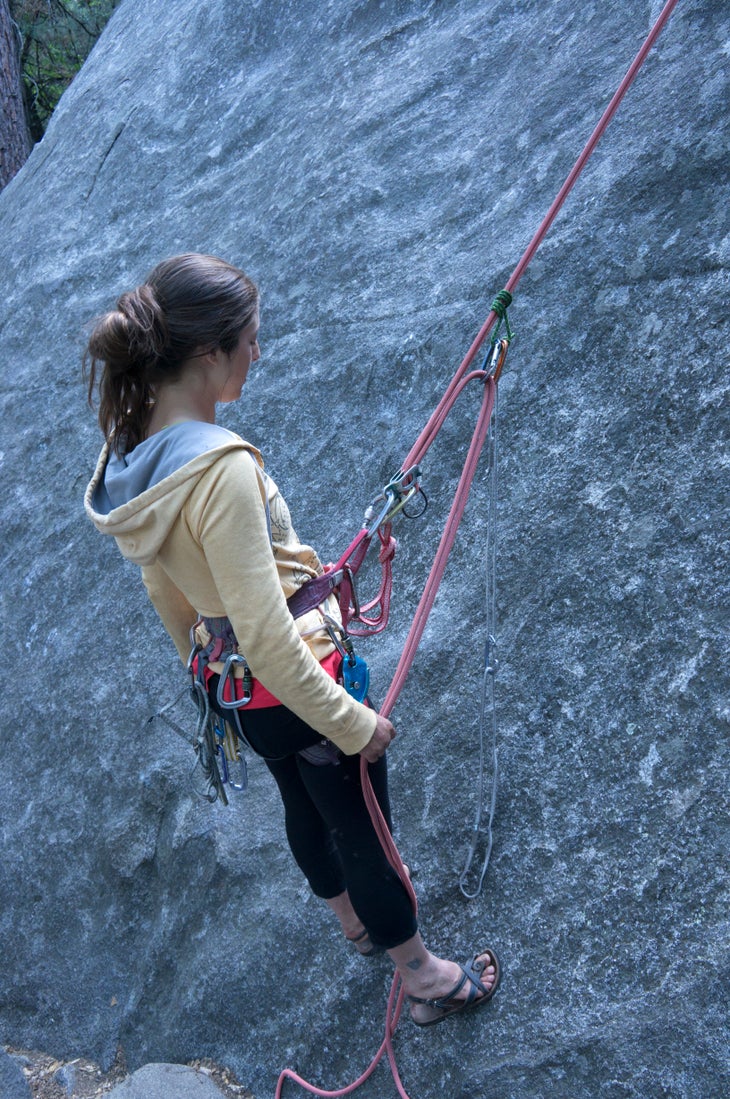
Weight the device and take tension off your friction hitch, retying it an arm’s length above your device. Clip it to your belay loop with a shoulder-length sling. Girth-hitch two more slings together and clip them directly to the friction hitch, creating ladders. (Shorten your loops by tying an overhand knot halfway along the sling.) Ascend the rope by raising your friction hitch and then standing on the rungs and pulling rope through your device. Sit on the device and repeat. (Fig 5; if using a non-guide-mode device, leave the prusik third hand attached below your device as a backup and slide the prusik up as you ascend; tie backup knots as needed.)
You can also use two prusiks to create ladders for each foot. Tie another friction hitch below your first one, rigged as above to form a foot loop, and clip it to your belay loop with a shoulder-length sling. Girth-hitch two slings together and clip them to this second prusik. Stand in each foot loop and alternate ascending each prusik. Every so often, pull slack through your device, which now serves only to back up the prusiks.
Beware the “Bail Trail”
Be wary of bail anchors left by previous parties. Even though we know better—say the guidebook clearly shows bolted anchors—we’ve still followed the tat wrapped around a tree or poorly equalized nuts in a seam. Clearly parties have descended this way, which has misled us to use these anchors, and soon we’re in sketchville. Resist this “quick out.” Instead take the time to find the correct anchors.
Sidebar: Flat Overhand
Bomber Rappel Knot or “Euro Death Knot”?
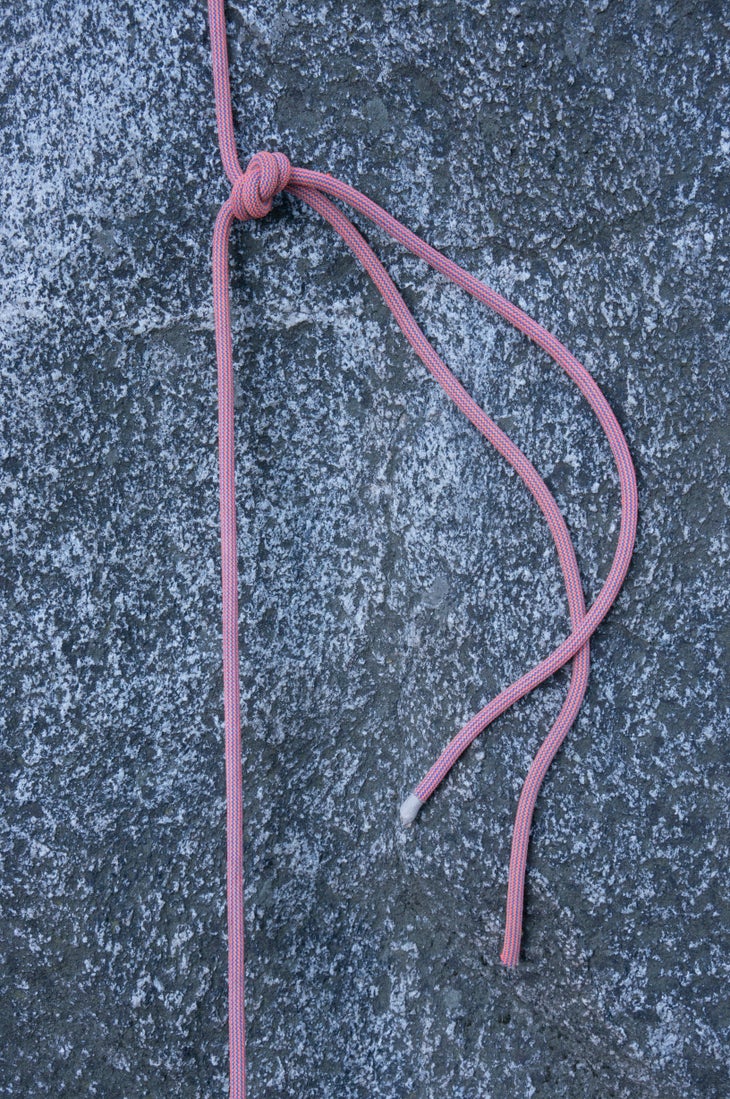
To connect two ropes for rapping, we recommend the flat overhand. Use both ends to form a loop, and pass both tails through the loop, creating an overhand knot. Tighten and dress the knot, pre-tension each strand, and leave 1.5-foot tails. If desired, tie a second flat overhand as a backup knot. Dress it and snug it to the first overhand. Do not mistake the flat overhand for the flat figure 8, which requires an additional half twist and threading the tails through the loop. When loaded, this knot gets pulled in opposite directions, causing it to roll apart. Never use the flat figure 8 for rappelling.
See In Defense of the European Death Knot for more.
Alexa Flower spends her summers climbing walls in Yosemite and working on YOSAR. Miranda Oakley has been climbing in Yosemite since 2006. In 2016, she became the first woman to solo the Nose in less than a day.