Adding Rust Qualities to Steel Materials

Steel Pipe’s Benefits and Uses Across Multiple Industries
February 4, 2022
Rust Prevention Tips for Steel and Other Ferrous Metals
March 29, 2022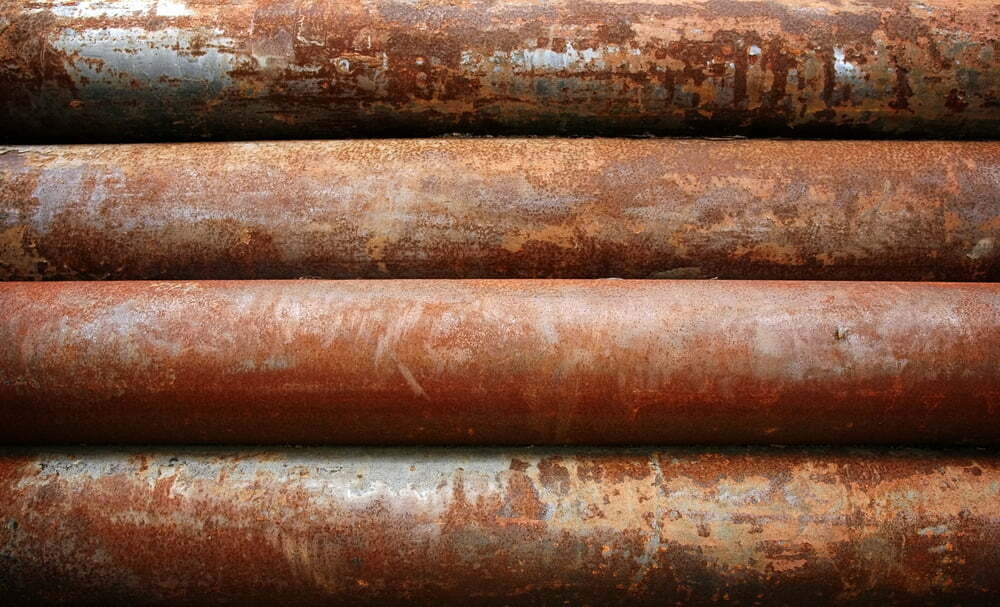
For the vast majority of common applications and uses, people naturally want to prevent the presence of rust in their metals — good examples here are things like power tools, vehicles and more. However, there are certain situations where certain steel or other metal objects will actually be improved through the rusting process, mainly through the development of a rusty patina that works for certain aesthetics or decoration needs.
At Wasatch Steel, we’re here to provide a wide range of steel products for clients, including steel sheet, steel pipe, steel bar and more. If you’re among those who aren’t looking primarily for rust prevention, and in fact may be looking to add rust to certain steel products, how can this be done? Actually, the answer typically lies in some common household products — but these have to be used properly and safely to accomplish your desired process. Here’s a rundown of how to go about adding rust to a given piece of steel.
Rust Accelerator Materials
First and foremost, this process will require the use of certain “rust accelerators,” or materials that will help you attain the rust effect you’re looking for. Here are some of the materials you’ll need:
- Table salt: This is a key player in the rusting process, as it will corrode the metal surface.
- Vinegar: Vinegar is acidic, and will also help to eat away at the metal surface. Ideally, white vinegar will be used for the rusting process.
- Degreaser: This will help to remove any oils or contaminants from the metal surface prior to the rusting process.
- Water: This is necessary to help carry the other ingredients and to provide some coolant for the process.
- Spray bottle: This will help to evenly distribute the ingredients over the surface of the metal.
- Safety equipment: Gloves, eye protection and a dust mask are all recommended when working with these materials.
- Hydrogen peroxide: This may be used during one part of the process.
Stripping the Steel
Once you’ve collected your materials, the first part of this process will involve stripping the steel of any coating or paint that may be present on the surface. This can typically be done with a paint stripper, or through sandblasting if the coating is particularly thick.
While you’re doing this, be sure to wear your gloves, eye protection and dust mask to avoid any contact with the chemicals or debris.
Degreasing Steel
Once the steel has been stripped of all coatings or paint, it will need to be degreased before rusting can take place. This is a process where you should follow the directions listed on your chosen degreaser.
Oftentimes, this will involve using a brush to apply the degreaser to the surface of the steel, letting it sit for a period of time, and then rinsing it off with water. You may need to repeat this process multiple times to ensure that all oils or contaminants have been removed.
As you’re going through this process, be sure to maintain sanitary conditions so you don’t add more oil or dirt to the area. For instance, never touch the steel with your bare hands, as this can add more oil that will need to be removed.
Steel Pickling
Especially if you’re looking to create a uniform rust across the entire steel piece, but even if not in many cases, the next step here will be pickling. This involves pouring some white vinegar into your spray bottle, then spraying the entire surface of the steel until it’s wet.
Let the vinegar sit on the surface for a few minutes, then let it dry in the sun. As with other parts of this process, you may have to repeat this step a few times to achieve the desired effect.
In certain situations, pickling can actually be accomplished by simply submerging the metal in white vinegar rather than spraying it. This guarantees that the vinegar will come into contact with every surface of the metal.
Oxidation Process
Now it’s time to really get down to it, and the first step here is creating your solution that will lead to rust. Combine 16oz of hydrogen peroxide, 2oz white vinegar and half a tablespoon of salt — if you can, add this solution to the leftover white vinegar in your spray bottle from earlier, then shake it up so everything mixes well.
Spray the entire surface of the steel with this solution, making sure to evenly coat it. You may need to do multiple coats for a more consistent rust. If you don’t see rust forming immediately, you may need to place the item in the sun — heat helps accelerate the rusting process.
As we noted earlier, do not touch the piece with your bare hands, or at all until it’s finished drying from this process.
Protecting the Patina
In addition to the above, it’s common for those adding rust to their steel to also add a finish that protects the piece for years into the future. There are a couple finish types that are commonly seen here:
- Solvent urethane resin: This refers to a non-yellowing, low-VOC polyurethane coating that’s both durable and high-quality. It’s good for not only steel, but also for brass, bronze, copper, aluminum and more.
- Opaque lacquer: A good option for preventing rust from continuing to form on the surface of the steel, this is a clear coating that will also protect against fading or chipping of paint. A common brand of opaque lacquer is ColorLoc, which helps lock in the color of any torch-heated materials. However, this format may be more ideal for other metal types besides steel.
For more on how to add rust to your steel material, or to learn about any of our steel products or steel services, speak to the team at Wasatch Steel today.