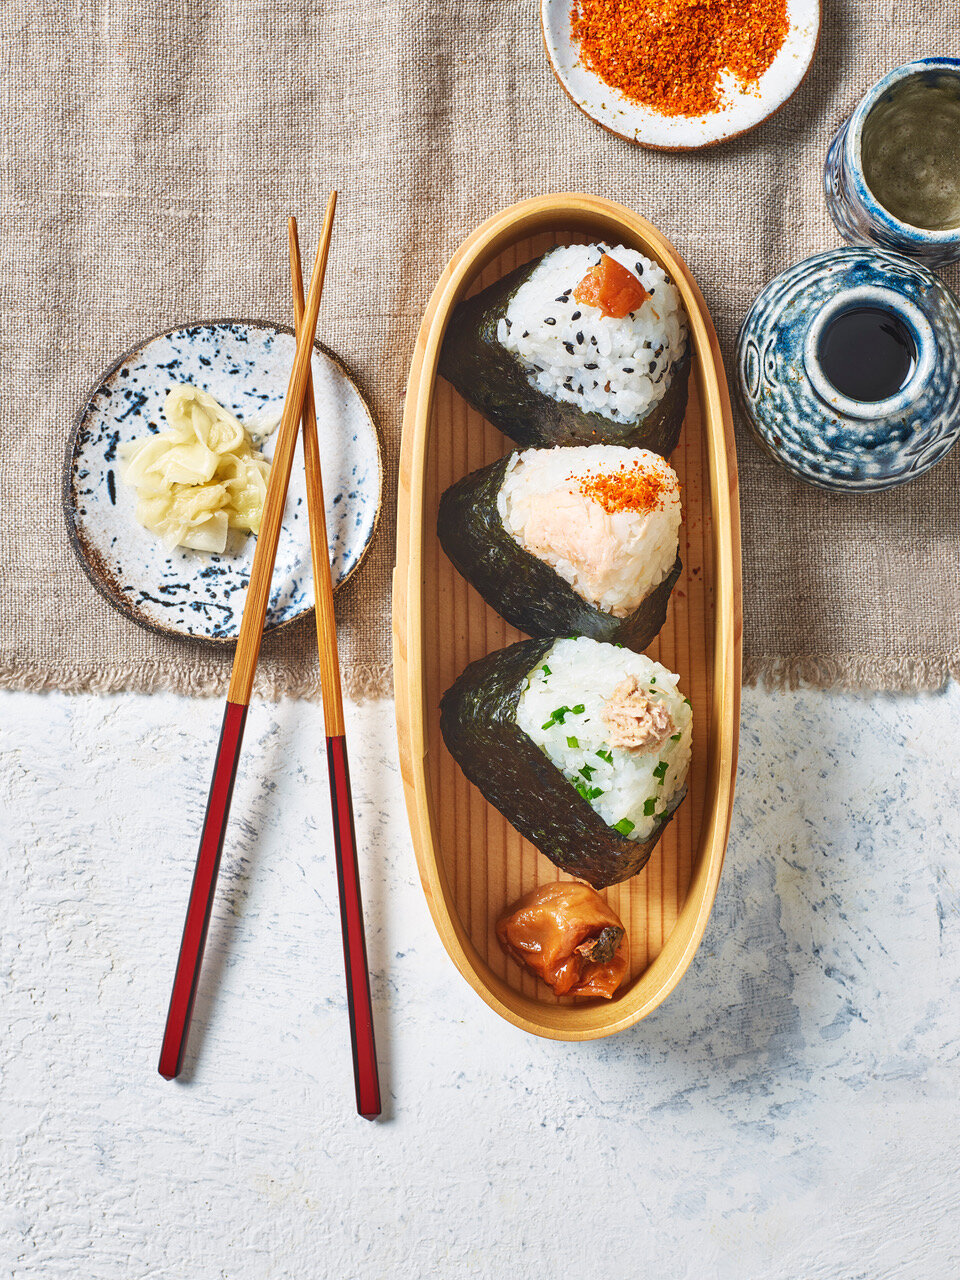
How to Make Onigiri - 3 Recipes
Onigiri is a small triangular rice snack that is eaten all over Japan. These delicious pyramids of rice could be compared to sandwiches in the west. They are tasty, satisfying, fit perfectly in a lunchbox and can be adapted to include a range of different fillings. In Japanese, Nigiri means “mould” which refers to the method of shaping, they are then stuffed with a pickle, fish or vegetable filling, sometimes meat too, and wrapped with nori seaweed. Onigiri, or Omusubi as they are known in eastern Japan, are a great way to use your perfectly cooked Japanese steamed rice. Unlike sushi, we never use vinegar flavouring in the recipe but instead stir some salt into the rice and sprinkle a little salt on the outside. Salt does not only add flavour in this instance, it also helps to preserve the rice and protect against food poisoning.
Onigiri are one of the oldest Japanese foods with records of rice balls being eaten as early as the 11th Century. Their portability and practicality have stood the test of time and they remain extremely popular to this day. Whenever I travel home from Japan, my Mum always give me a few Onigiri to take as a snack for the journey. I would describe them as an everyday food, whereas sushi is often reserved for a special meal or a celebration. Onigiri are great picnic food and they are a particular favourite of my daughters for her packed lunch. In Japan, convenience stores pack their shelves full of onigiri to fuel hungry workers and sararīmen’s commutes across cities.

Follow @yukiskitchen on Instagram


If you’re If you’re ever in Tokyo you can take a trip to the oldest Onigiri restaurant in Tokyo: Onigiri Asakusa Yadoroku. This tiny 16 seater restaurant serves traditional flavours such as salmon and pickled plum as well as seasonal specials including pickled Japanese basil and salted cod roe. Pickled plums, or umeboshi, are eaten widely across Japan. Ume fruits, which are somewhere between a plum and an apricot, are picked and then packed tightly with salt for at least two weeks while they preserve. These little flavour bombs are used to pack a punch in many Japanese dishes and are even used as a hangover cure due to their high electrolyte content. I like to buy my umeboshi from clearspring, their jars of pickled plums come from a farm that uses traditional production methods in the Wakayama prefecture.

How to Make Onigiri - 3 Recipes
Ingredients
- 1 full-sized sheet of nori seaweed paper (cut lengthwise into thirds)
- Water for hands
- Cooked Japanese rice and fillings (refer to recipes)
- A pinch of salt
- 1 fillet of salmon (180g-200g)
- 2 cups water
- 1 tbs of sake (optional)
- A pinch of sea salt (per onigiri)
- 1 tsp of toasted white sesame seeds
- 5 - 6 handfuls of rice (500 -600g)
- 2 full sized sheet of Nori seaweed paper (cut it lengthwise into thirds)
- 5 - 6 pieces of Umeboshi (Japanese pickled plum), stone removed
- 10 tsp of black sesame seeds
- Ainch of sea salt (per onigiri)
- 6 Handfuls of rice (500-600g)
- 2 full-sized sheet of Nori seaweed paper (cut it lengthwise into thirds)
- 100g tinned tuna chunks in brine
- 1 tbsp mayo (you can use Japanese or any favourite English brand)
- 1 tsp miso
- ½ tsp sesame seeds
- 2 tsp of finely chopped chives
- 6 Handfuls of rice (500-600g)
- A pinch of sea salt (per onigiri)
- 2 full sized sheet of Nori seaweed paper (cut lengthwise into thirds)
Method
- Cut a full-sized sheet of Nori seaweed paper into thirds lengthwise.
- Wet both of your hands with tap water to avoid the rice sticking to your hands.
- Then put a pinch of salt on your palms and rub them together to evenly spread the salt.
- Place a handful (90-100g) of cooked flavoured rice (salmon, black sesame seed or chives) into one hand and push the centre to make a hole for the filing. You do not need to do this for the salmon onigiri.
- Put an Umeboshi or teaspoon of tuna mayo on the centre of the rice. Then cover the filling with the rice and use your hands to hold the rice in place around the filling and gradually make it into a trianglular shape. Keep your hands firm and tight enough to create the triangle shape and to make sure the onigiri does not fall apart. Occasionally turn it around with your hands. Let it cool down if the rice is still hot. Otherwise the nori paper will become soggy from the hot rice.
- Wrap the onigiri with nori.
- Place a little bit of each filling on top of the onigiri as a garnish if you like.
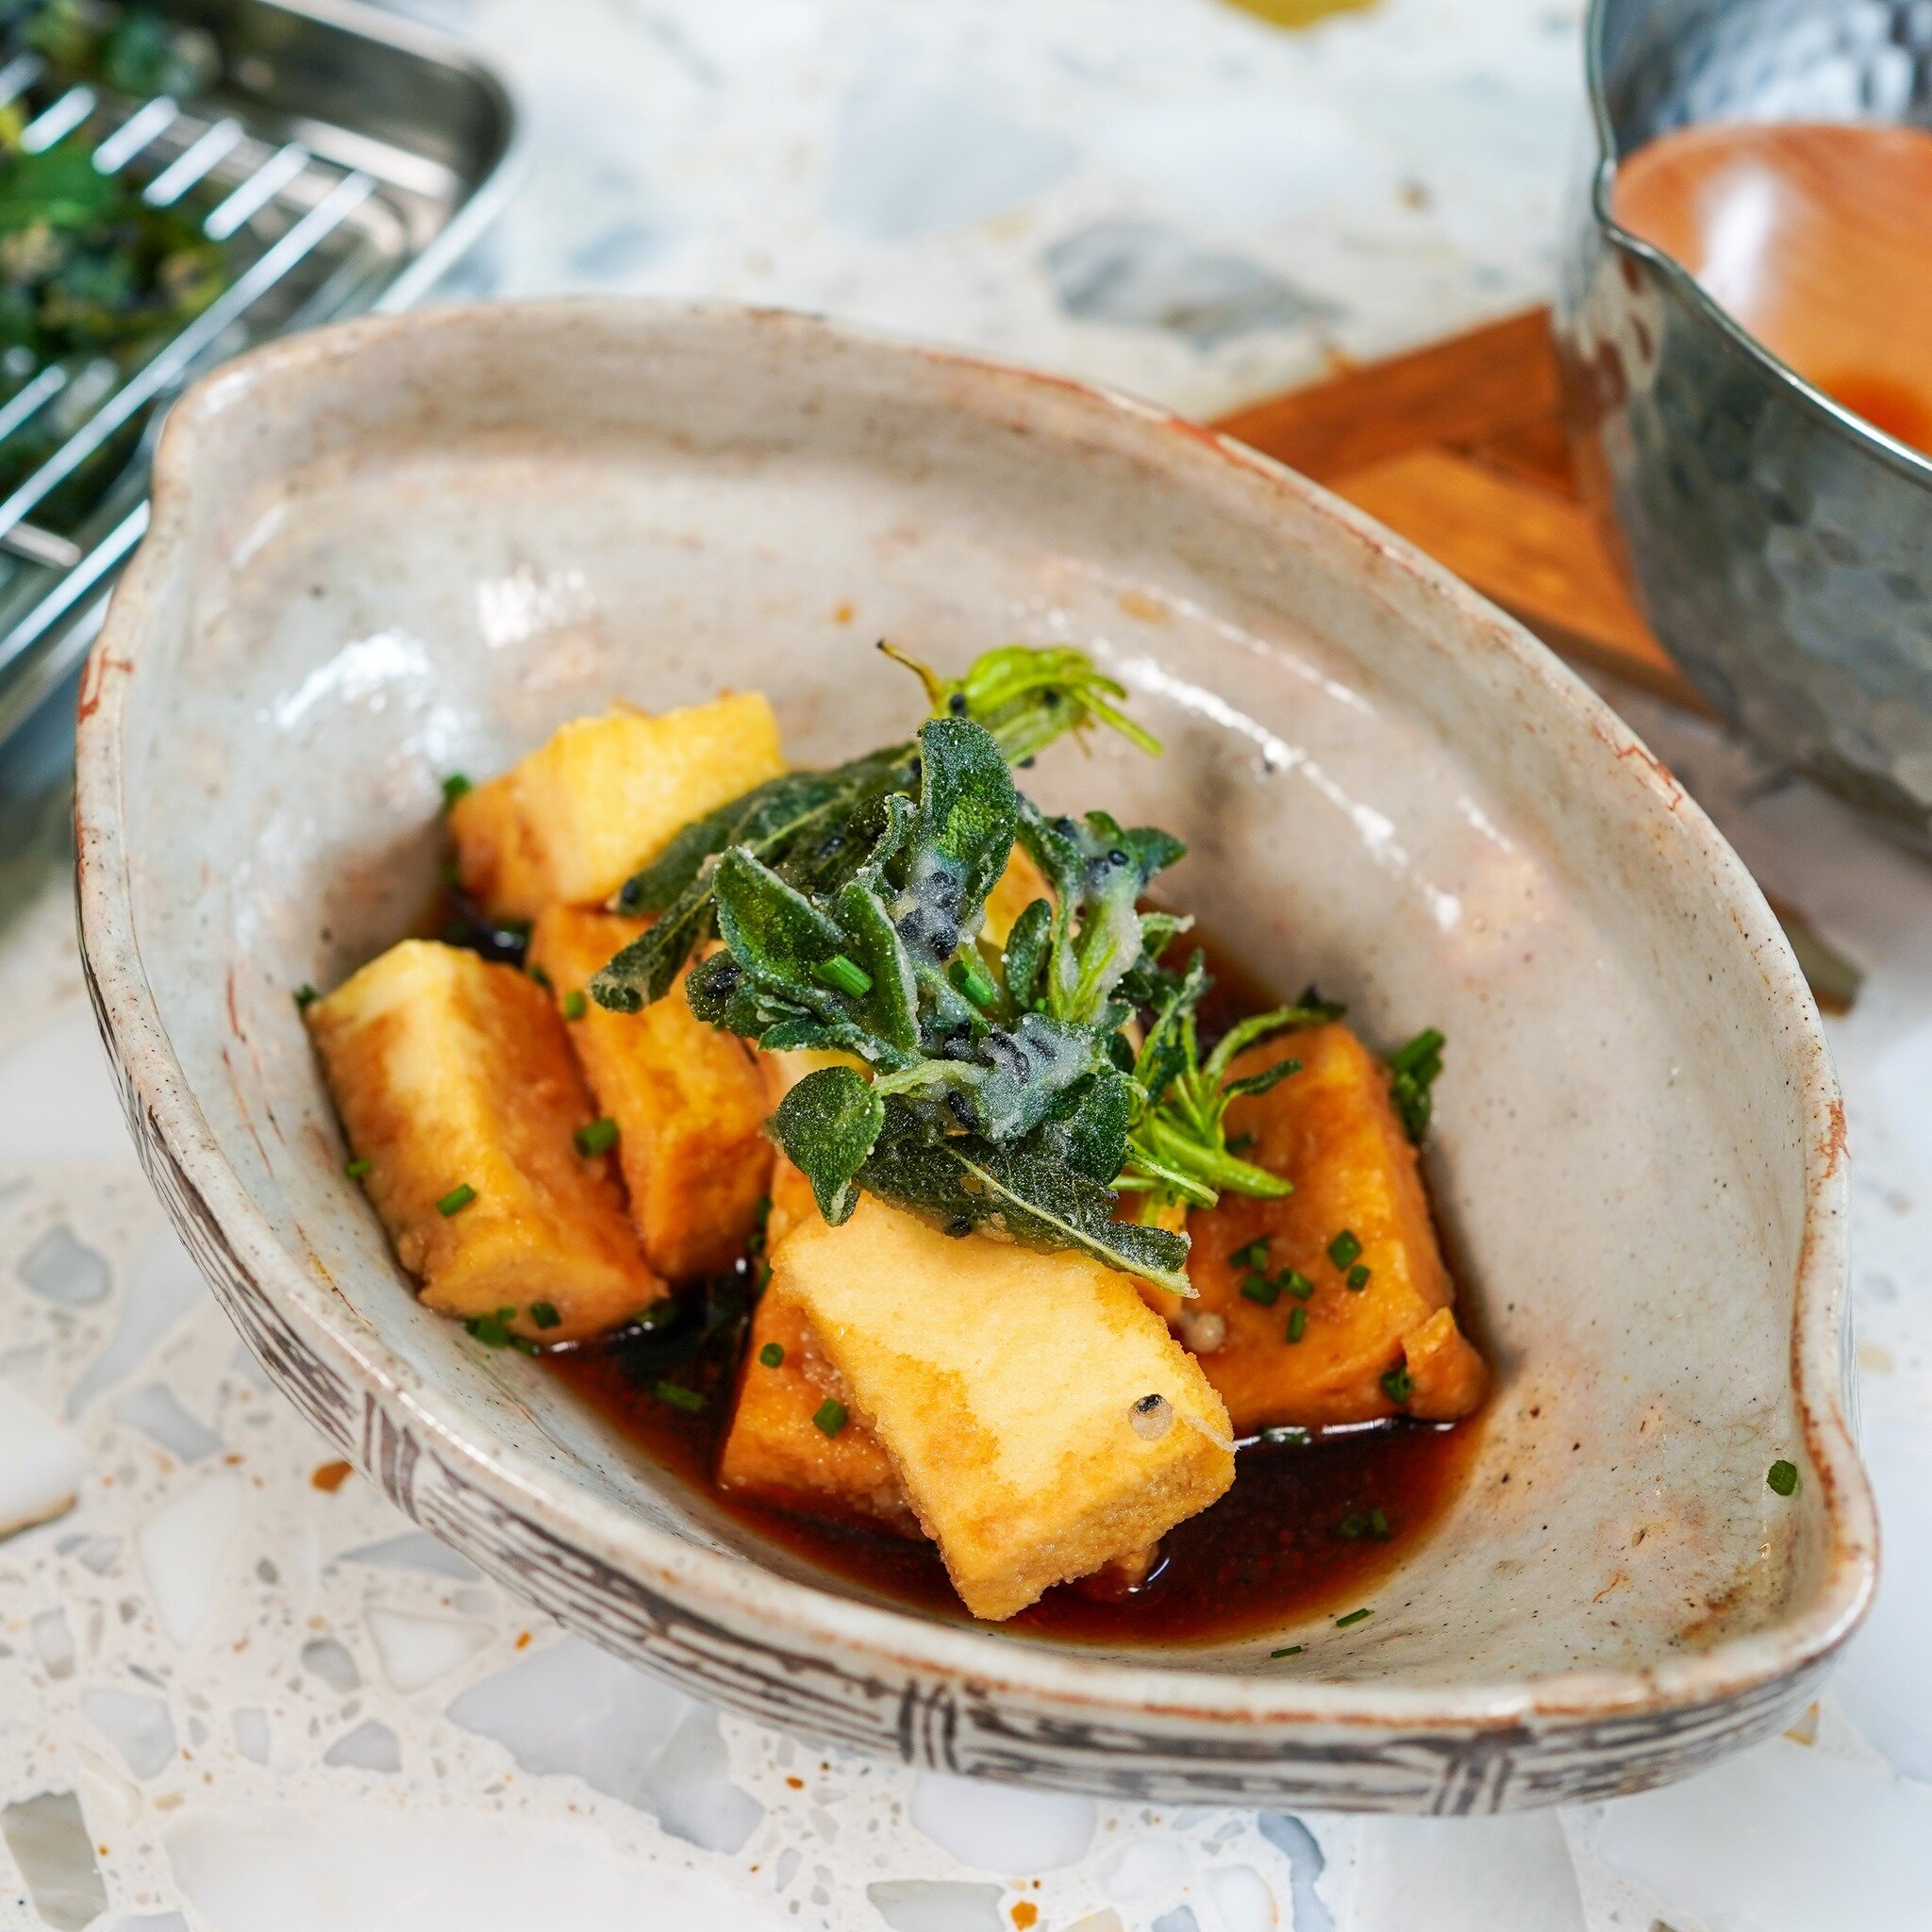
- To make the poached salmon, sprinkle some salt onto the salmon fillet. Put two cups of water into a shallow pan and bring to the boil.
- Next, place the salmon into the pan with one tablespoon of sake if you have it. Put the lid on and simmer for 10-15 minutes. Make sure the salmon is cooked through for this recipe then remove from the pot and pat dry with paper towel or cloth. I normally like it a bit pink in the middle but when poaching salmon for onigiri, it is important that it is cooked through.
- Flake the salmon with a fork, Using a bowl, add two tablespoon of salmon flakes, the sesame seeds and a hand of cooked Japanese rice into the bowl, mixing together well. This makes “salmon rice”.
- Now the salmon rice is prepared, follow the main Onigiri recipe.
- This is a great for a vegetarian / vegan option. The umeboshi will be placed into the centre of your onigiri.
- Mix the black sesame seeds, a pinch of salt and a handful of cooked Japanese rice into the bowl and mix together.
- With the rice and umeboshi filling prepared, follow the main Onigiri recipe.
- Drain the water from the tuna very well and add the mayo, miso and sesame seeds into the bowl and mix well. The tuna mayo will be used as a filling in the centre of the Onigiri.
- Add the chopped chives, a pinch of salt and a handful of cooked Japanese rice into a bowl and mix well.
- With the filling prepared, follow the main Onigiri recipe.
- If you find bit tricky to make the shape of onigiri by hands, you can buy an “onigiri mould online or in Japanese shops. It’s a plastic triangular mould that will not only shape your own homemade onigiri recipe perfectly, but will also have those Japanese rice balls turn out in a uniform size
- Another hack is to use a bit of kitchen plastic-wrap to help you mould your onigiri more easily without them falling apart in your hands.
- For the salmon onigiri you can grill the salmon but poaching it gives the light clean taste traditionally associated with salmon onigiri.
- To keep and wrap the onigiri you can use tin foil, bees wax paper or baking paper to wrap the onigiri.
UPCOMING CLASSES


