

(cibachrome) prints
(cibachrome) prints
(cibachrome) prints

Create successful ePaper yourself
Turn your PDF publications into a flip-book with our unique Google optimized e-Paper software.
FRAMING INSTRUCTIONS FOR ILFOCHROME (CIBACHROME) PRINTS<br />
Note: HANDELING PRINTS: Cibachrome <strong>prints</strong> are extremely fragile. Use cotton gloves<br />
always. Pick up <strong>prints</strong> slowly to avoid bending print and making a ding.<br />
CIBACHROME <strong>prints</strong> can be adhesive mounted or hinged to the backing.<br />
ADHESIVE MOUNTING may be the best solution for some situations such as traveling<br />
exhibitions or when maximum flatness is desired. Mounting with cold-press adhesives<br />
should be done by a lab familiar with mounting Ilfochromes. The best material for adhesive<br />
mounting is aluminum.<br />
LOOSE HINGING is best for archival preservation. Some advantages are:<br />
1)The print may be removed from the backing and reframed.<br />
2)The back of the print can be viewed to see the title and signature.<br />
3)There is no question as to the lasting qualities of a mounting adhesive.<br />
The backing should be an acid free material such as 100% acid free rag board, aluminum,<br />
or acrylic sheet.<br />
The backing material that I prefer for loose hinging is 1/8 inch acrylic sheet (Plexiglas).<br />
Acrylic sheet holds the print flat by static electrical attraction. It also has the "clear"<br />
advantage that the back of the print can be viewed even in the frame. Because different<br />
brands of acrylic may have different electrostatic properties, the same brand or batch of<br />
acrylic sheet should be used for the backing as well as the glazing to make sure that the<br />
print is not attracted to the glazing more than the backing.<br />
The Hinging Technique must allow for differential expansion and contraction of the print<br />
and the backing when there are changes in temperature or humidity. If a print is attached<br />
to the backing at two different points, and the backing contracts more than the print, then<br />
the print will surely show wrinkling between these two points. The solution is to fasten the<br />
print in only one place: the Top Center Hinge. This will allow the print and the backing to<br />
move independently of each other in all directions from the top center.<br />
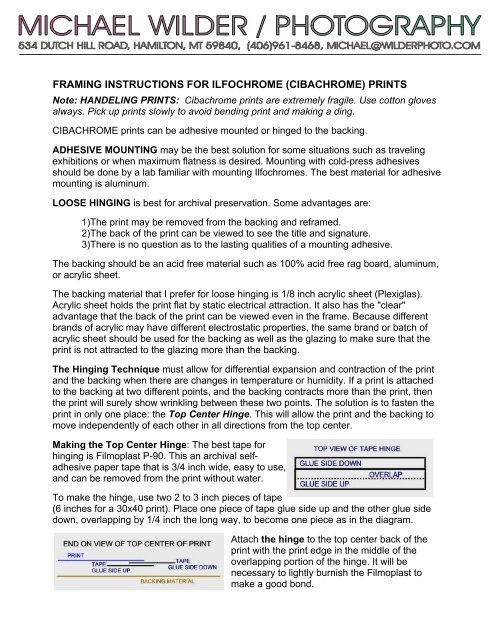
Making the Top Center Hinge: The best tape for<br />
hinging is Filmoplast P-90. This an archival selfadhesive<br />
paper tape that is 3/4 inch wide, easy to use,<br />
and can be removed from the print without water.<br />
To make the hinge, use two 2 to 3 inch pieces of tape<br />
(6 inches for a 30x40 print). Place one piece of tape glue side up and the other glue side<br />
down, overlapping by 1/4 inch the long way, to become one piece as in the diagram.<br />
Attach the hinge to the top center back of the<br />
print with the print edge in the middle of the<br />
overlapping portion of the hinge. It will be<br />
necessary to lightly burnish the Filmoplast to<br />
make a good bond.
Two Corner pieces are used to keep the print from "rocking" on the hinge. The print is<br />
held in position by only two corner pieces that touch only the top edge of the print. Use only<br />
these two top corner pieces. Do not tape the print anywhere else, as this will interfere with<br />
the free movement of the print. I have seen many <strong>prints</strong> wrinkled because a framer<br />
followed these instructions exactly, then, to be "extra safe" they added extra tape to the<br />
sides or the bottom of the print to hold it in<br />
position.<br />
Each of the two corners is made from a<br />
piece of acid-free bond paper that is folded<br />
and taped to the backing with Filmoplast P-<br />
90 as follows:<br />
The corner piece should be in light contact with the top edge of the print, but the side<br />
edges should have a minimum of 1/8 inch expansion space between the print and the<br />
corner piece to allow for movement in the lateral direction.<br />
The print should be free to move in the corner. Once<br />
framed, there should not be too much pressure pushing the<br />
over mat against the print, as this will prevent the print from<br />
sliding freely.<br />
The print on the<br />
backing<br />
THE OVER MAT: Glossy Ilfochrome <strong>prints</strong><br />
must be separated from the glazing. An over<br />
mat serves to separate the print from the<br />
glazing as well as to hold the edges of the print<br />
down. The over mat should cover the outer<br />
edges of the print by a minimum of 1/4 inch. The over mat should be four-ply 100% rag<br />
board or eight-ply over mat for 24x30 and larger <strong>prints</strong>. It is possible to frame a print<br />
without an over mat, but some other method must be used to separate the print from the<br />
glazing, and to also allow free movement of the print on the backing.<br />
CLEANING: The surface of Cibachrome <strong>prints</strong> is extremely fragile, and even cotton will<br />
scratch it with too much pressure. Dust may be removed using dry compressed air and a<br />
soft brush. Do not blow on the <strong>prints</strong> by mouth, or allow people viewing them to talk looking<br />
down on the <strong>prints</strong>, as droplets of saliva will cause surface marks, and may cause the<br />
colors to change permanently. An artist's chamois or PecPads with a few drops of Pec-12<br />
will remove oil from finger <strong>prints</strong> without scratching the print.<br />
STORAGE: Prints may be stored flat in mats or in boxes. Glossy <strong>prints</strong> may also be stored<br />
safely in boxes that are standing up. Prints should always have their surface covered with<br />
a soft, chemical free material such as Reemay spun polyester sheets. Materials such as<br />
clear acetate, Mylar, glassine, some commercially available interleaving tissues, or the<br />
backs of other Ilfochrome <strong>prints</strong> are much too hard, and will scratch the surface of the<br />
<strong>prints</strong>. Ideal storage conditions are 20 to 30 percent relative humidity and cool (less than<br />
68F - 20C).<br />
You may freely distribute instructions in their entirety. Copyright 2005 / WilderPhoto.com